22 Stunning Snowflake Christmas Nails to Try This Year

Stuck picking a Christmas nail design that won’t look overdone by New Year’s? Snowflake Christmas nails solve that problem better than almost any other holiday design. They read as winter, not costume, so they carry you from the office party through New Year’s Eve without a single repaint.
This guide breaks down 22 snowflake nail designs, from simple line art to salon-level 3D detail, so you can build a winter snowflake manicure that actually fits your schedule. You will also get the nail shape and skin tone matches that keep a design from looking cluttered, plus exact steps for painting snowflakes yourself at home.
Wondering if DIY holds up against a salon set? We compare cost, time, and how long each version lasts so you know what you are signing up for before you open a polish bottle.
What Makes Snowflake Nails a Holiday Favorite
Snowflakes read as winter instantly. They never look childish the way Santa hats or reindeer prints can. They also pair with almost any base color, from icy blue to deep burgundy, so the theme bends to fit your personal style instead of forcing one look on everyone.
A Motif That Works for Any Occasion
A single snowflake accent nail feels elegant enough for an office party. A full set covered in glitter and snowflake dots feels festive enough for New Year’s Eve. Few holiday designs stretch across that many occasions without needing a full redo in between.
Why Salons and Group Sets Keep Choosing It
A busy nail salon might paint dozens of snowflake sets in the weeks before Christmas alone. White, silver, and icy blue stay the most requested shades year after year. The design also works well for matching sets among friends or bridesmaids at a winter wedding, since each person can pick a slightly different color while keeping the same core motif. That mix of shared theme and individual style is harder to pull off with more literal icons like ornaments or trees.
How to Choose Your Snowflake Nail Look
Your nail shape, length, and skin tone all shape which snowflake style looks best on you. Picking the wrong combination can make a design look cluttered or mismatched. A little planning before your appointment, or before you open a polish bottle, saves a repaint later. If snowflakes are not the only theme on your list, our full winter nails roundup covers more seasonal options.
Best Shapes and Lengths for Snowflake Art
Nail shape and length decide how much detail a snowflake design can hold.
- Almond And Coffin: more canvas space near the tip, best for detailed or layered snowflakes
- Square And Round: better for smaller, single-accent snowflakes, since the flatter surface limits how much detail reads clearly
- Short Nails: simple, line-drawn snowflakes hold up best
- Long Nails: enough room for 3D snowflakes built from acrylic powder or clustered rhinestones
Matching Colors to Your Skin Tone
Skin tone shifts which base color makes a snowflake design pop.
- Cool Skin Tones: icy blue, silver, or white, since these shades echo the same cool undertones
- Warm Skin Tones: burgundy, gold, or deep green, since these contrast nicely with warmer undertones
- Any Skin Tone: white or silver snowflakes work as neutral accents instead of competing colors
22 Snowflake Christmas Nails to Try Right Now
These 22 designs range from beginner-friendly to salon-level detail. There is an option here no matter your skill level, or how much time you have before your holiday event.
1. Icy Blue Base With White Snowflake Outlines

Icy blue is the go-to base for a reason. It mimics frost without trying too hard. Paint two even coats and let them dry fully. Then use a thin brush dipped in white polish to trace simple snowflake outlines, one per nail. Keep the lines light and spaced evenly near the cuticle. It suits any shape or length, and it holds up well in photos. That is probably why so many salons default to it every December. If icy blue is your favorite part of this look, check out our full blue winter nails guide for more shades to try.
2. Silver Snowflake Accent Nail on Nude

A soft nude base keeps this look wearable at work, while one silver snowflake on the ring finger adds just enough sparkle. Paint the nude shade first and let it cure. Then switch to the accent nail, add a fine silver snowflake, and finish with a glossy top coat. It reads as polished, not costume-like. That makes it a safe pick for anyone who wants a hint of the holidays without committing to a loud, full set.
3. Matte Burgundy With One Glitter Snowflake

Matte burgundy already looks rich on its own, so this design keeps the glitter to a single accent nail. Skip the top coat on the matte nails to preserve that velvet texture. On the accent nail, use a glossy top coat over the glitter snowflake so it catches the light. The contrast between matte and shine does most of the visual work here, and it takes almost no artistic skill to pull off. Fans of this shade can find more options in our burgundy nails collection.
4. French Tip With a Stamped Snowflake
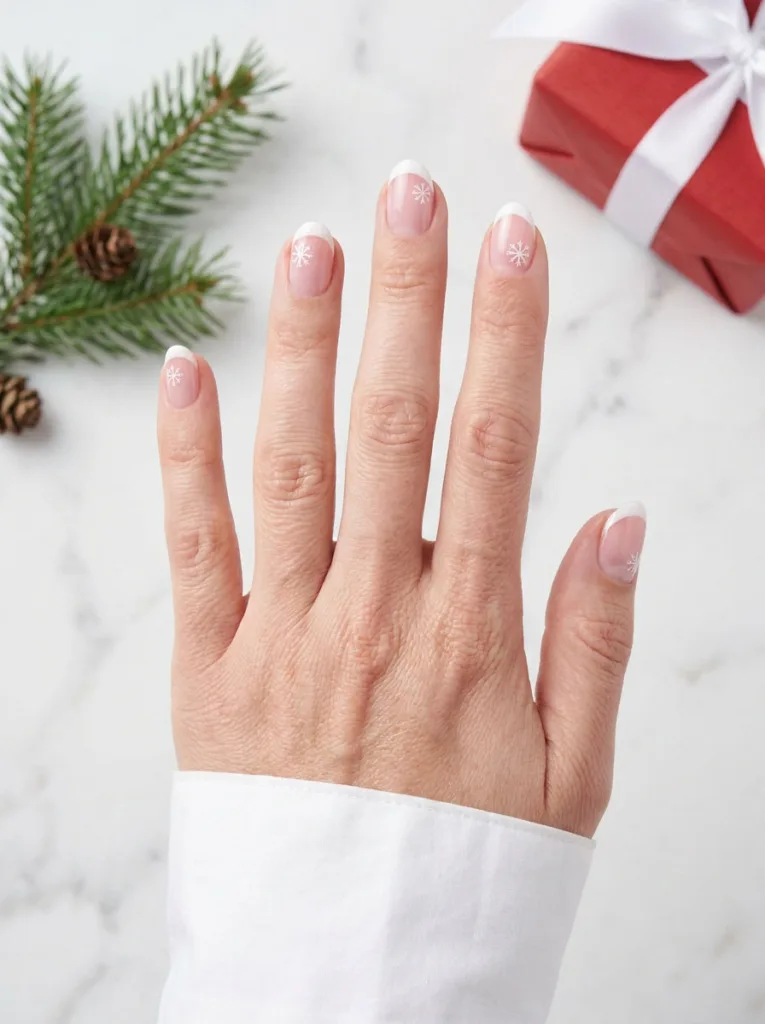
Classic french tips get a small upgrade with one snowflake stamped near the smile line. Start with a sheer pink or nude base, then paint or stamp the white tip as usual. Once that dries, add a tiny snowflake stamp just above the tip line on one or two nails. This version stays subtle enough for work, and it takes less time than a full snowflake set since most of the nail stays plain. For more ways to dress up the classic look, see our French tip Christmas nails guide.
5. Chrome Silver With Hand-Painted Snowflakes

Chrome powder gives nails a mirror-like finish, and white snowflakes painted on top stand out sharply against it. Apply the chrome as directed on a gel base, buff it to a shine, then hand-paint fine snowflake lines using white gel polish and a thin brush. Cure between steps if you are working with gel. The reflective base means even simple, slightly imperfect lines look intentional under any lighting.
6. Black Base With Metallic Gold Snowflakes

Black nails already read as bold, and gold snowflakes push this design toward glamorous rather than gothic. Paint two coats of matte or glossy black, then use a fine gold liner to draw the snowflake shapes. This combination suits evening events better than daytime wear, since the contrast is dramatic. Almond and coffin shapes give the gold detail more room to stand out clearly. Browse more moody options in our black Christmas nails roundup.
7. 3D Snowflakes on Long Almond Nails
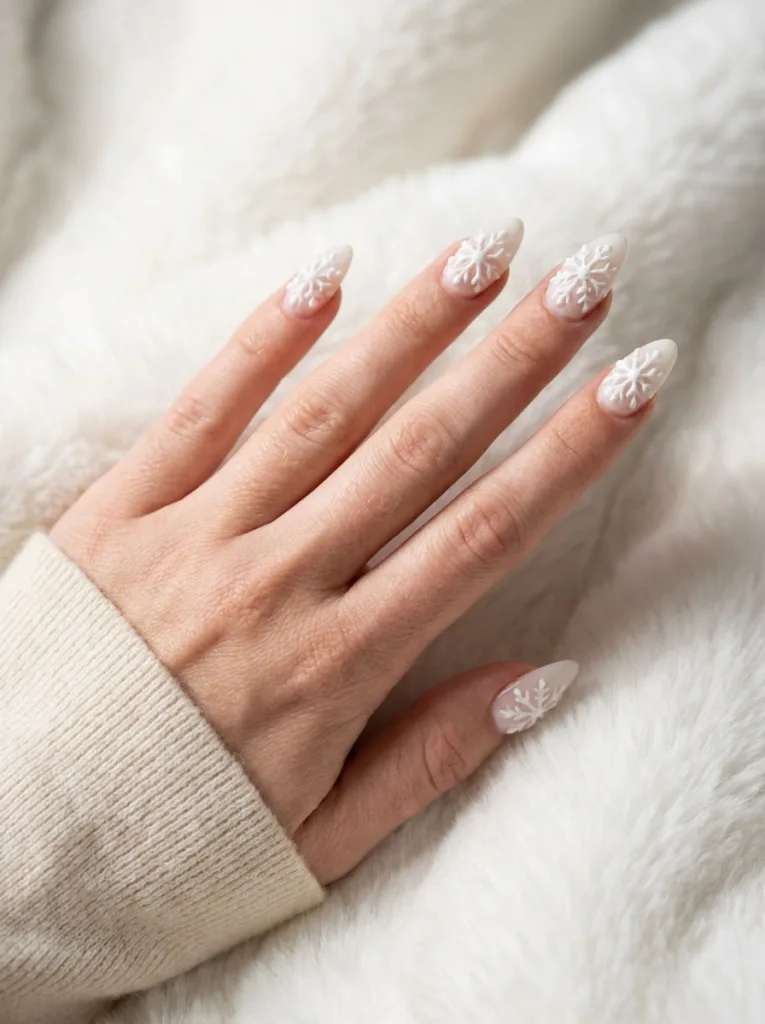
This is the most advanced design on the list, and it needs longer nails to look right. Acrylic powder gets sculpted into small raised snowflake shapes, then painted white or left in a sheer clear finish. Almond nails give the sculpted piece enough flat space to sit properly. Expect this one to run closer to salon prices, since it takes real skill and extra time to build well.
8. Ombre Blue-to-White With Scattered Dots
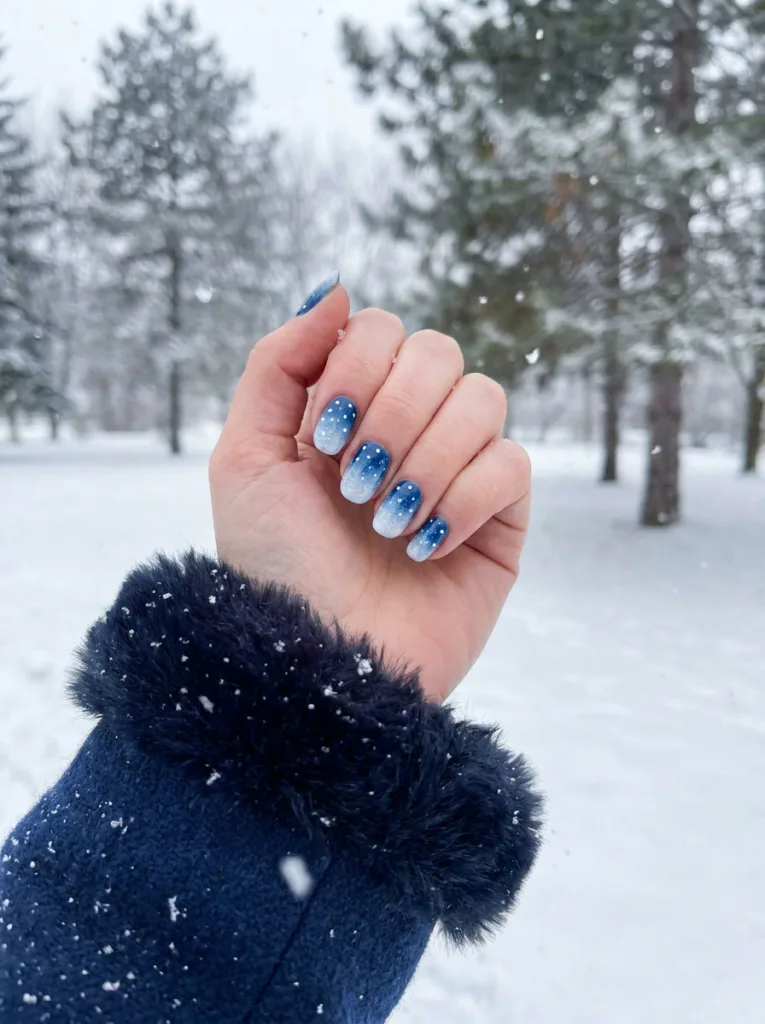
An ombre fade from deep blue at the cuticle to white at the tip already looks wintry before you add anything else. Once the gradient sets, use a dotting tool to scatter small white dots across the nail, mimicking falling snow rather than a formal snowflake shape. It is a looser, more casual take on the theme, and it forgives small mistakes since the dots never need to be perfectly even.
9. Clear Jelly Base With Rhinestone Snowflakes
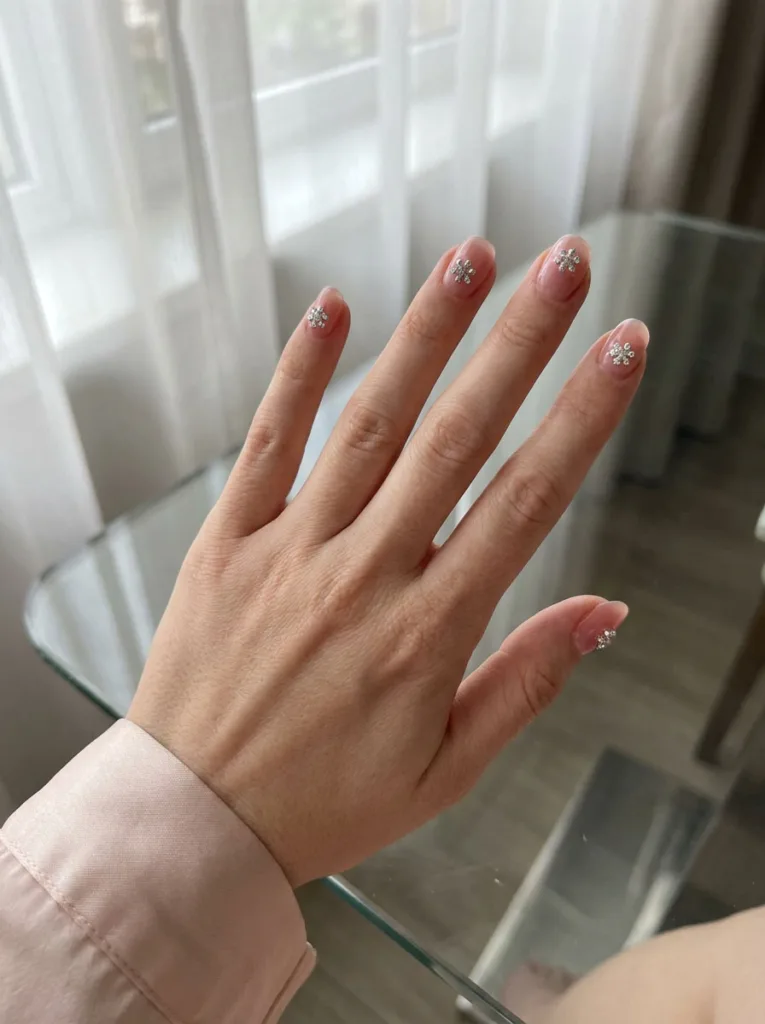
Jelly polish leaves a translucent, glass-like finish that lets the natural nail show through underneath. Rhinestones shaped or arranged into tiny snowflakes sit directly on top, held in place with clear gel and cured under a lamp. This design works best on shorter nails, where the sheer color keeps things looking clean rather than bare. It photographs well against almost any background, since light passes through the base.
10. Deep Green With a Frosted Snowflake Accent

Deep green makes a strong alternative to the usual red-and-white holiday palette. Paint the full set in a matte or satin green, then add one frosted, semi-sheer white snowflake to a single accent nail. The frosted finish keeps that one nail from competing too hard with the rich green base. This pairing suits warmer skin tones especially well, since green sits close to gold on the color wheel.
11. Pastel Lavender With Delicate White Linework

Lavender is not a typical Christmas color, which is exactly what makes this design stand out. Paint a soft pastel lavender base, then use a fine white liner brush to draw delicate, thin snowflake outlines rather than bold ones. Keep the lines sparse across the nail instead of centered, so the pastel base still gets room to breathe. This look suits anyone who wants winter nails without the usual red, green, or icy blue.
12. Glitter Gradient Tips With Snowflake Stamps

Start with a clear or pale base, then sponge glitter polish onto just the tips to build a gradient fade. Once that layer sets, stamp a small snowflake pattern over the glitter using a clear stamping plate and white polish. The glitter adds texture, while the stamped snowflake adds a defined shape on top. This version works well for New Year’s Eve, since the glitter already carries the sparkle factor on its own.
13. Two-Tone Navy and White Split by a Snowflake
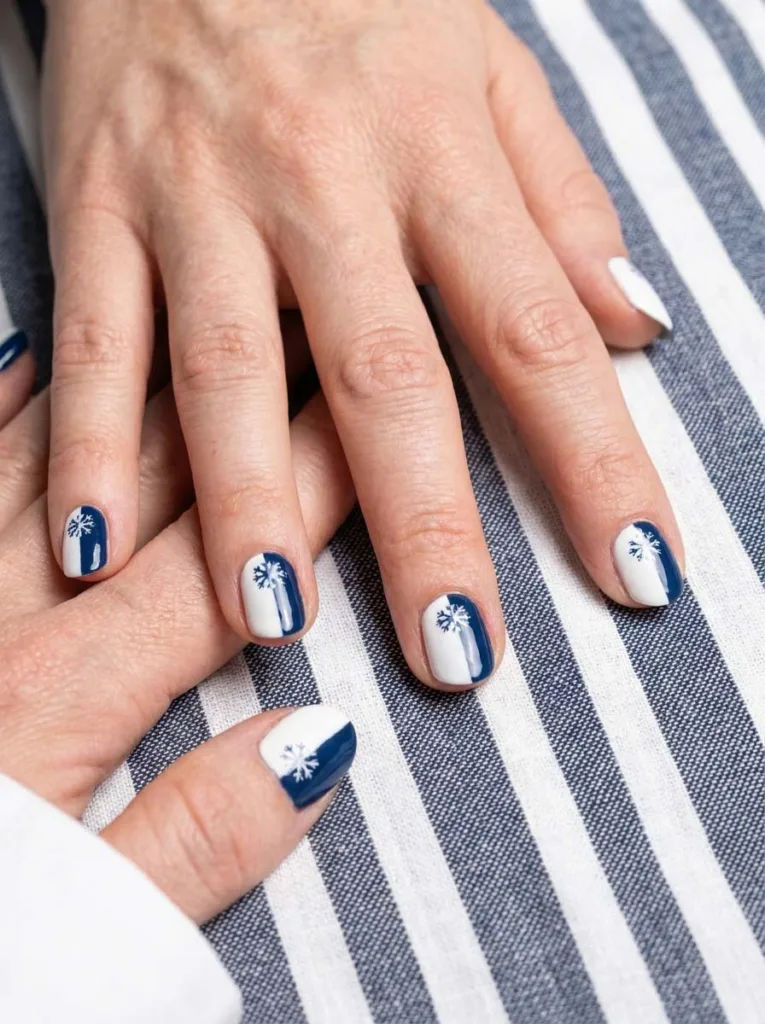
Paint one half of each nail navy and the other half white, splitting the color with a diagonal or straight line down the center. Place a small snowflake right where the two colors meet, so it acts as a visual bridge between them. This design has a more modern, graphic feel than most snowflake looks. It suits square or coffin shapes best, since the flat sides hold a clean split line.
14. Rose Gold With Snowflake Foil Transfers
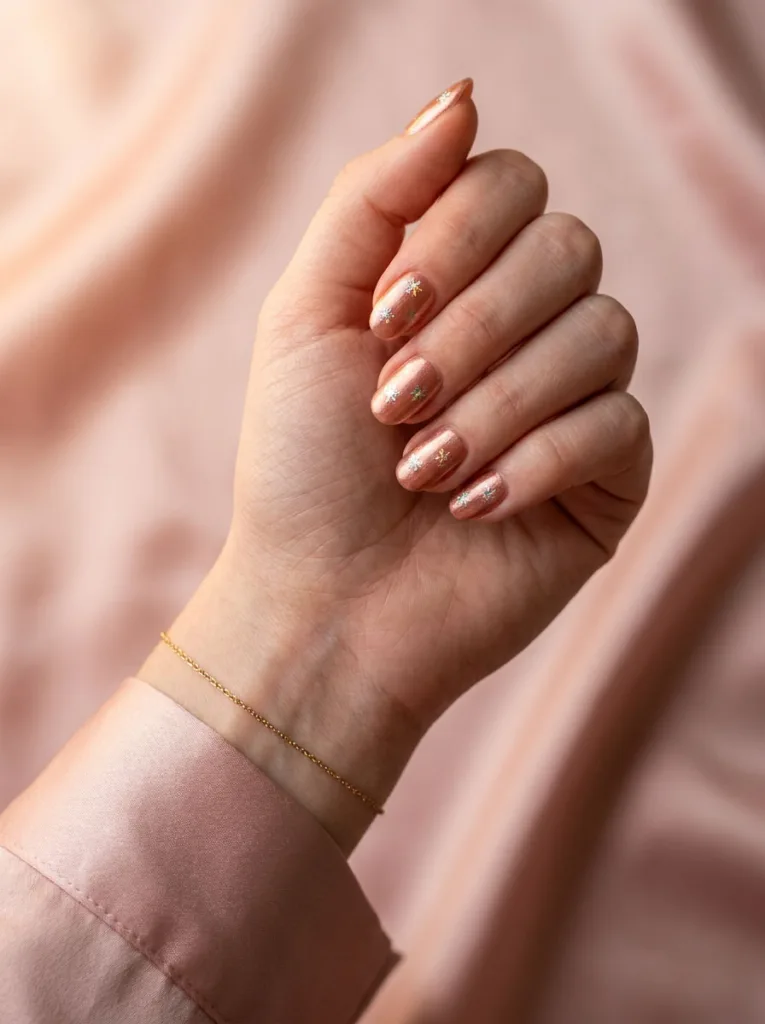
Rose gold nails already lean warm and glamorous, and foil snowflake transfers add detail without any freehand painting. Apply the rose gold base, cure or dry it, then press pre-cut snowflake foil pieces onto the nail using foil glue. Seal with top coat once placed. This is one of the fastest designs on the list to finish, since the foil does most of the visual work for you.
15. Short Square Nails With One Bold Snowflake
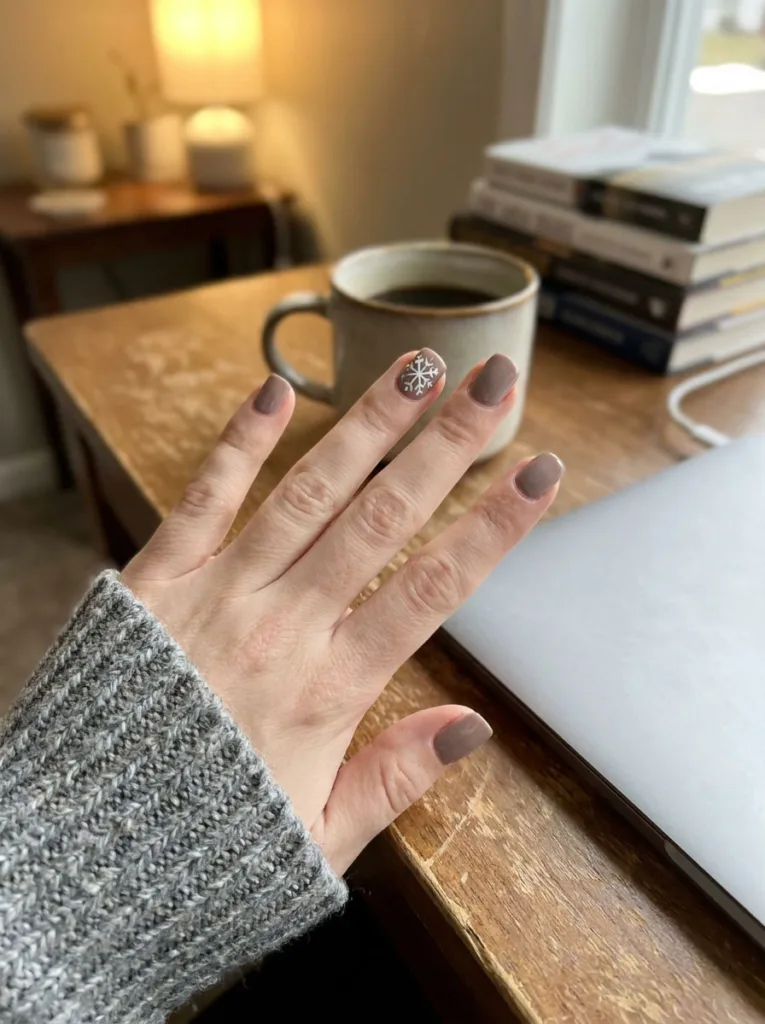
Short nails do not need a full set of detail to look festive. Paint a neutral or icy base across all ten nails, then commit to one large, bold snowflake on just the ring finger. Square nails give that single design a wide, flat surface to sit on. That keeps the lines from looking cramped. This is a strong option for anyone who works with their hands often and needs low-maintenance nail art.
16. Milky White With Barely-There Outlines
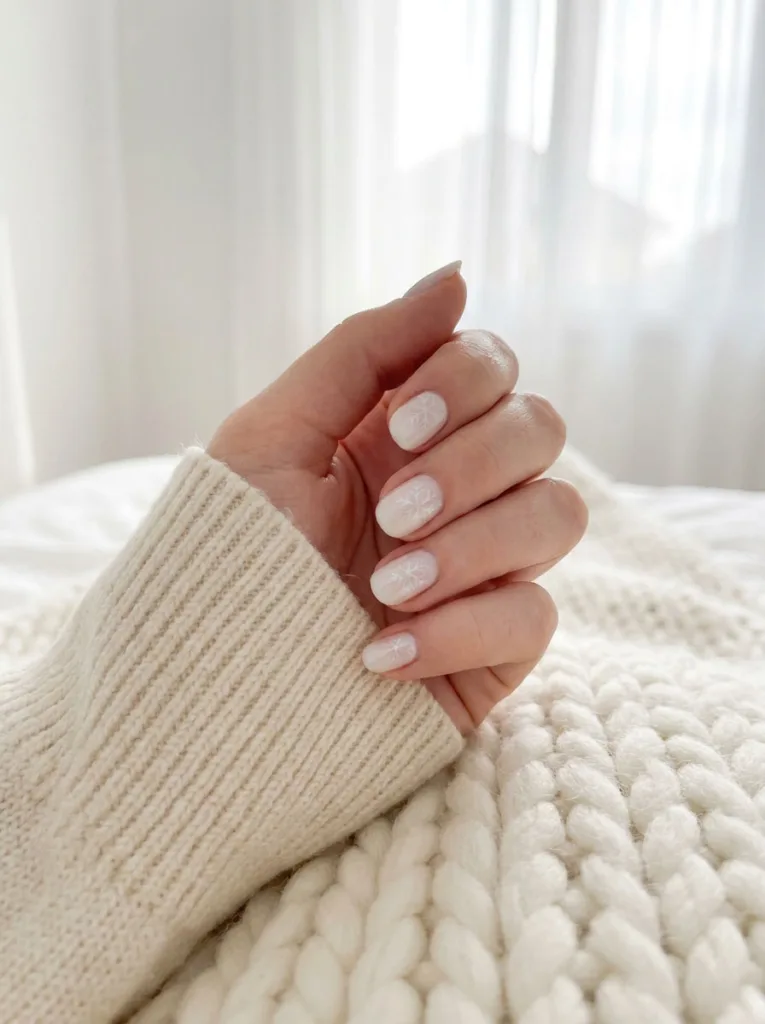
A milky white base has become popular well outside the holiday season, and it takes to snowflake detail beautifully. Use a slightly whiter or pearlescent polish to draw faint snowflake outlines that barely stand out from the base. The effect reads as textured rather than boldly patterned from a distance. This subtle approach suits anyone who wants a hint of the theme without a graphic, high-contrast design. For more all-white inspiration, see our white Christmas nails guide.
17. Dark Plum With Silver Dotting Art
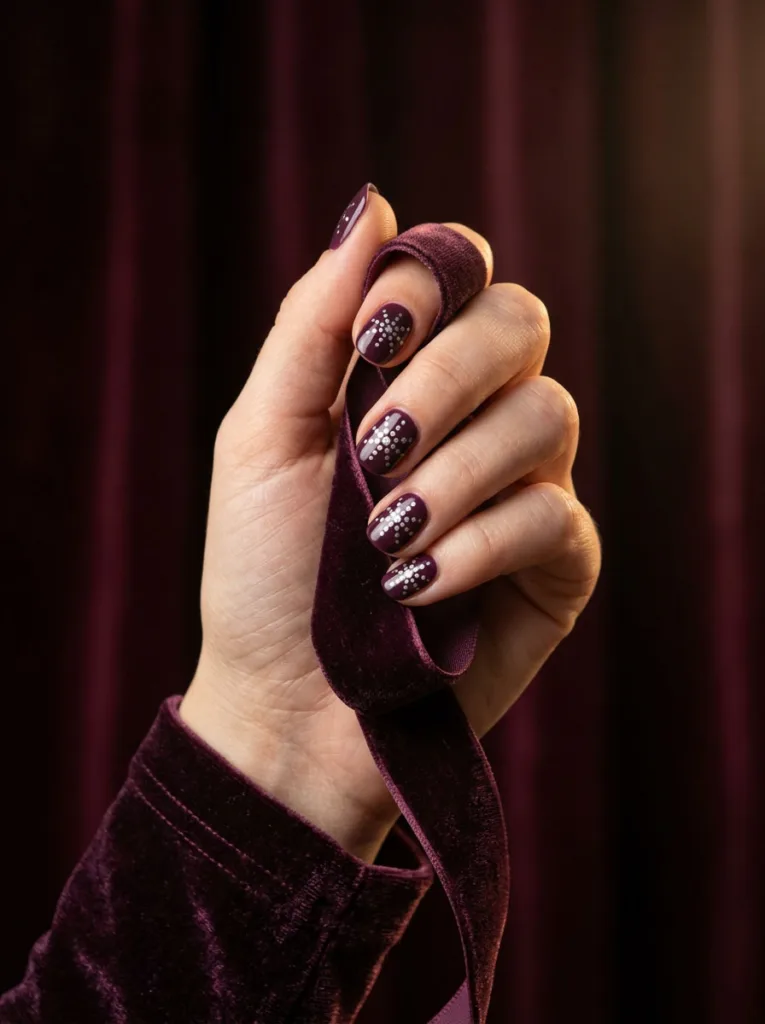
Dark plum sits between burgundy and black, and it gives silver dotted snowflakes a rich, moody backdrop. Paint two coats of the plum shade, then use a small dotting tool loaded with silver polish to build snowflake shapes dot by dot instead of with brush lines. The dotting technique is more forgiving for beginners than freehand painting, since slightly uneven dots still read as intentional texture.
18. Snowflake Decals Over a Soft Pink Base

Pressed decals are the fastest way onto this list to get a detailed snowflake look without any drawing at all. Paint a soft pink base, let it dry completely, then apply pre-made snowflake decals using tweezers and a drop of water or nail glue, depending on the type. Seal everything with a top coat so the edges of the decal do not catch or peel during the week ahead.
19. Metallic Teal With Stamping Plate Snowflakes

Teal is an underused holiday color, and it pairs well with white snowflake stamping. Paint a metallic teal base, let it cure, then use a snowflake-patterned stamping plate with white polish to transfer a full, symmetrical design across each nail. Stamping guarantees a level of precision that freehand painting cannot always match, especially for anyone still building their nail art confidence and steady hand.
20. Velvet Matte Black With a Crystal Snowflake Charm
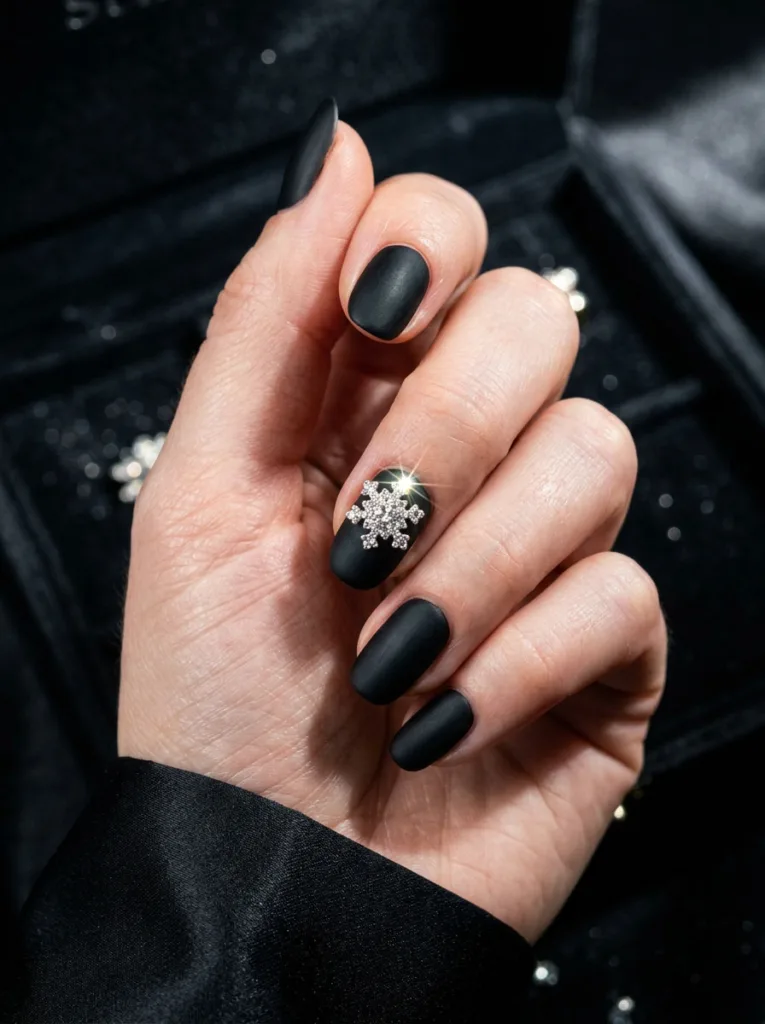
This design skips painted snowflakes entirely in favor of a single, sculptural crystal charm shaped like a snowflake. Paint the full set in velvet matte black, then apply the charm to one accent nail using clear gel or nail glue, sealed under a top coat for hold. It leans more luxury than craft project, and it suits formal holiday events where you want texture without much visual noise.
21. Champagne Shimmer With Faint Line Art

Champagne shimmer polish already catches light on its own, so the snowflake linework here stays intentionally faint and simple. Paint two coats of the shimmer base, then use a fine white or silver liner to sketch loose, minimal snowflake shapes rather than dense ones. This design leans elegant over playful. That makes it a solid choice for a more formal Christmas or New Year’s look.
22. Two-Shade Marble With a Painted Snowflake
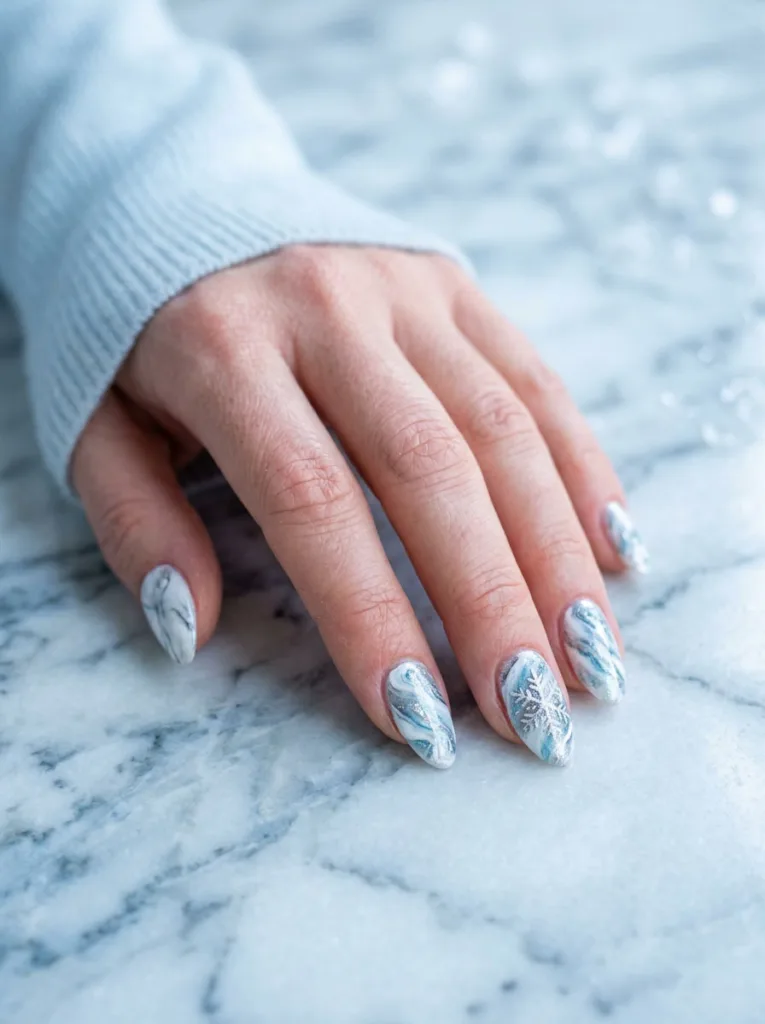
Marbling two colors, often white and icy blue, creates a swirled base that already looks like frost before you add anything. Use a marbling tool or thin brush to drag the two polishes together while still wet, then let the design cure fully. Once set, paint a single snowflake across the swirl on one or two nails to anchor the pattern. No two marbled nails turn out identical, which is part of the appeal.
Mixing two or three of these ideas across one set, rather than repeating the same design on all ten nails, often looks more polished and less repetitive.
Tools and Products for Snowflake Nail Art

A few simple tools make the difference between a clean snowflake and a smudged one. None of them require salon training, and most cost less than a single manicure appointment.
Tools for Hand-Painted Snowflakes
Both tools below work directly with regular polish, so you do not need a gel setup to try them.
- Dotting Tool: creates the small round centers many snowflake designs use
- Thin Nail Art Brush (Size 000 Or 00): gives you control for the fine branching lines
Tools for a Faster, No-Fuss Finish
No steady hand yet? These three tools do most of the work for you.
- Nail Art Pens: the easiest entry point for beginners, since they work like a fine-tip marker instead of requiring brush control
- Striping Tape: creates straight lines for geometric snowflake bases before you add detail by hand
- Stamping Plate: transfers a full snowflake pattern in seconds, no freehand painting needed
Whatever tools you choose, a good glossy top coat is not optional. It protects the fine details from chipping and gives the whole manicure a finished shine.
How to Paint Snowflake Nails at Home
You do not need salon tools to recreate most of these looks. A dotting tool, a thin brush, or even a clean bobby pin dipped in polish can create clean snowflake lines.
Step 1: Prep and Base Coat
Start with two coats of your base color, letting each coat dry fully before adding any detail. Rushing this step is the fastest way to smear the design later, so give it real time.
Step 2: Draw the Snowflake Base
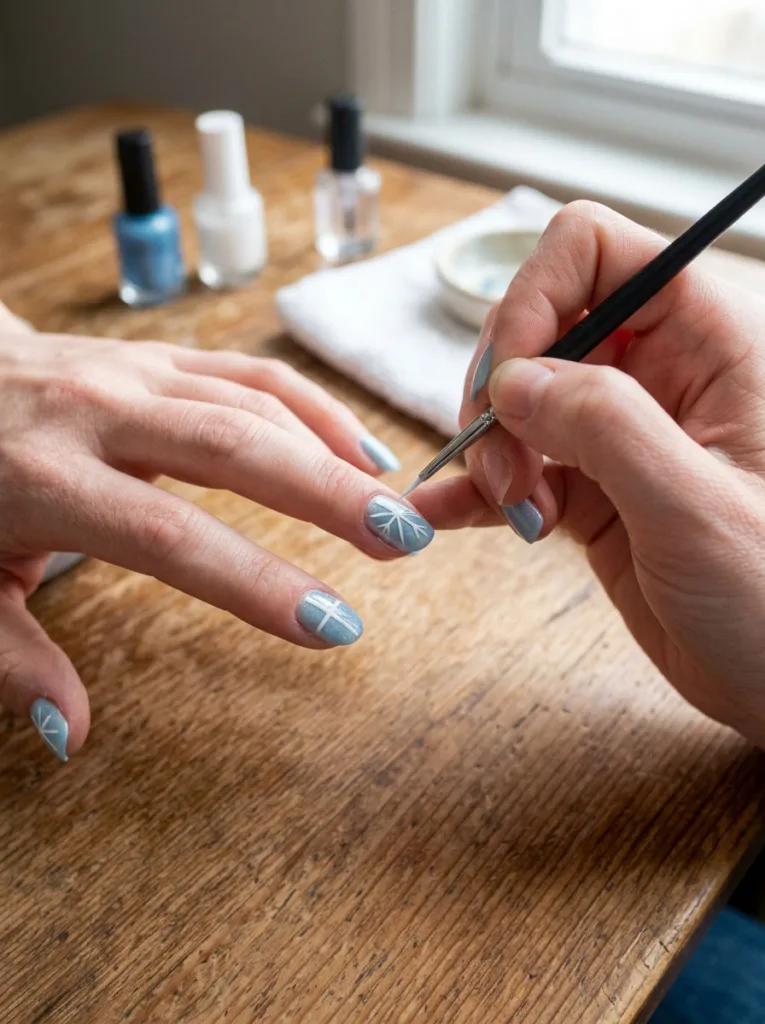
Dip a thin brush in white or silver polish, then draw one straight vertical line and one horizontal line to form a plus sign across the nail. Add two diagonal lines through the center point to complete the six-point base shape.
Step 3: Finish and Seal
Finish each of the six arms with two small angled dashes near the tip. This mimics the branching look of a real snowflake without much extra effort. Seal everything with a glossy top coat to protect the design and add shine that lasts. If your hand is not steady yet, practice the plus-sign base on paper first. Nail art pens also help beginners, since they control polish flow better than a loaded brush.
Salon Versus DIY: Cost and Time Compared
Both routes get you to the same finished look, but the cost and time trade-offs are worth knowing before you book or buy.
| Route | Cost | Time |
| Salon gel manicure | $45 to $75 (past $90 with 3D or rhinestones) | 60 to 90 minutes |
| DIY at home | $15 to $25 for a reusable kit | 45+ minutes, faster with practice |
Salon Cost and Time
A salon gel manicure with snowflake nail art typically runs $45 to $75, depending on complexity and location. Adding 3D snowflakes or rhinestone clusters can push that price past $90 per set. The appointment itself usually takes 60 to 90 minutes from start to finish.
DIY Cost and Time
Doing it yourself costs far less over time. A basic kit with polish, a dotting tool, and top coat runs $15 to $25 and covers multiple manicures across the season. The tradeoff is time rather than money. A first attempt at hand-painted snowflakes can take 45 minutes or longer, though most people speed up after two or three tries.
How Long Snowflake Nail Art Lasts
Wear time depends on which version you choose, so a winter snowflake manicure built to survive a busy holiday season needs a different base than one meant for a single New Year’s Eve party. Match your pick to how long you need it to hold up.
| Nail Type | Wear Time |
| Gel | 2 to 3 weeks |
| Regular polish | 5 to 7 days |
| Press-ons | 1 to 2 weeks |
Gel Snowflake Nails
Gel-based snowflake designs last two to three weeks with proper care and a solid top coat. They resist chipping better than any other option on this list, which makes them worth the extra salon time. Dermatologists also recommend applying sunscreen to your hands before a gel appointment since the curing lamp uses UV light and moisturizing your cuticles between visits to keep nails from turning brittle, according to tips shared by the American Academy of Dermatology.
Regular Polish Snowflake Nails
Regular polish versions last five to seven days before chipping becomes visible around the tips. They are the easiest to redo at home, which makes the shorter wear time less of a drawback.
Press-On Snowflake Nails
Press-on snowflake nails last one to two weeks, depending on how well they are applied and how much water exposure they get during that stretch. A fresh top coat every few days extends the life of any version. Gloves for dishwashing help too, since water and detergent are the biggest threats to nail art longevity.
Mistakes to Avoid With Snowflake Nail Art
A few small errors account for most ruined snowflake manicures, and every one of them is easy to avoid once you know what to watch for. Good nail care basics also help any design last longer, regardless of which mistake you are trying to dodge.
Skipping the Top Coat
This is the most common mistake people make. Without a top coat, snowflake details smudge or fade within a single day of wear, undoing all the earlier effort.
Overloading Every Nail With Detail
Covering all ten nails in intricate snowflakes can make a manicure look cluttered instead of festive. One or two accent nails often look more polished than ten busy designs competing for attention.
Using Thick Polish Straight From the Bottle
Thick polish straight from the bottle makes clean lines nearly impossible to achieve. Thin the polish slightly, or use dedicated nail art polish, for crisp edges every time.
Rushing the Base Coat Dry Time
Painting snowflakes over a still-wet base smears the entire design and forces a full redo. Give the base coat real time to set before adding any detail on top.
Frequently Asked Questions
1. How do you make snowflake nails easy?
Draw a plus sign, then add diagonal lines through the center point. Finish with small angled dashes at each tip using a thin brush or dotting tool.
2. What nail shape works best for snowflake designs?
Almond and coffin shapes offer the most space for detailed snowflakes. Square and round shapes suit smaller, single-accent designs best.
3. How long does snowflake nail art last?
Gel versions last two to three weeks. Regular polish lasts five to seven days. Press-ons last one to two weeks with proper application.
4. Can beginners do snowflake nail art at home?
Yes. Nail art pens and dotting tools make simple snowflake shapes achievable for beginners. Start with one accent nail before attempting a full set.
5. What colors pair best with snowflake nails?
Icy blue, silver, white, and burgundy are the most popular base colors for snowflake designs during the holiday season.
6. Do snowflake nails work for short nails?
Yes. Short nails suit simple, single-color snowflake outlines better than 3D or heavily layered designs, which need more surface area.
Conclusion
Snowflake Christmas nails give you 22 ways to bring winter charm to your hands this season, whether you book a salon appointment or pick up a dotting tool tonight. Match your pick to your nail shape, your skin tone, and how long you actually need the look to last, since a one-night New Year’s set calls for a different base than a winter snowflake manicure meant to survive the whole season. Pick one design from this list, gather a thin brush or nail art pen, and try it on a single accent nail before committing to a full set.