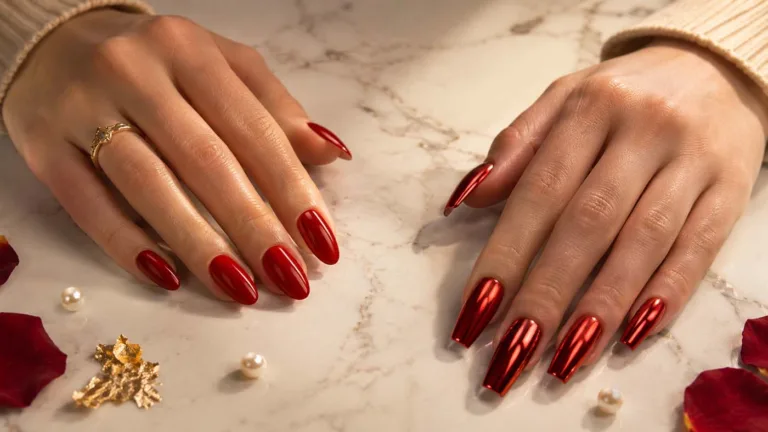
18 Easy Smiley Face Nails Designs Anyone Can Do at Home
Smiley face nails are not just a trend. They are one of the biggest nail art movements right now.
From celebrity manicures to everyday DIY looks, this retro-inspired design has exploded in popularity this season. The Y2K revival brought it back. Dopamine dressing kept it alive. Now it ranks among the most searched cute nail designs of the moment.
The best part? You do not need a salon appointment or a professional kit. No expensive tools either. Just a dotting tool, a steady hand, and a few nail polish shades.
These 18 easy smiley face nails designs cover it all. Simple minimalist accents, bold colorful statement nails, and everything in between. Pick your favorite design and get started this weekend.
Why Smiley Face Nails Are Having a Major Moment
The Y2K aesthetic never fully went away. It just got louder.
Smiley face nail art sits right at the center of two massive style movements: retro nail trends and dopamine dressing. Both celebrate color, joy, and self-expression through fashion and beauty. Nails became the easiest, most affordable canvas for that.
Minimalist nail art dominated for nearly 3 years. Clean, quiet, understated. But in 2026, people want personality on their fingertips again. Smiley faces deliver exactly that. Bold without being complicated. Fun without requiring professional skill. That combination is why this trend keeps growing.
What You Need Before You Start
You do not need a full nail salon kit. A few targeted tools make all the difference.
Essential supplies:
- Dotting tool or toothpick
- Thin nail art brush (size 000 or liner brush)
- Black nail art pen
- Yellow, white, and nude gel or regular polish
- Top coat (gel or regular)
- Nail tape or striping tape (optional)
- UV lamp (if using gel polish)
A toothpick works just as well as a dotting tool for beginners. Dip the tip in polish and apply with light, controlled pressure. Clean lines come from thin coats, not expensive tools. Get your supplies ready before you start and the process stays smooth from the first nail to the last.
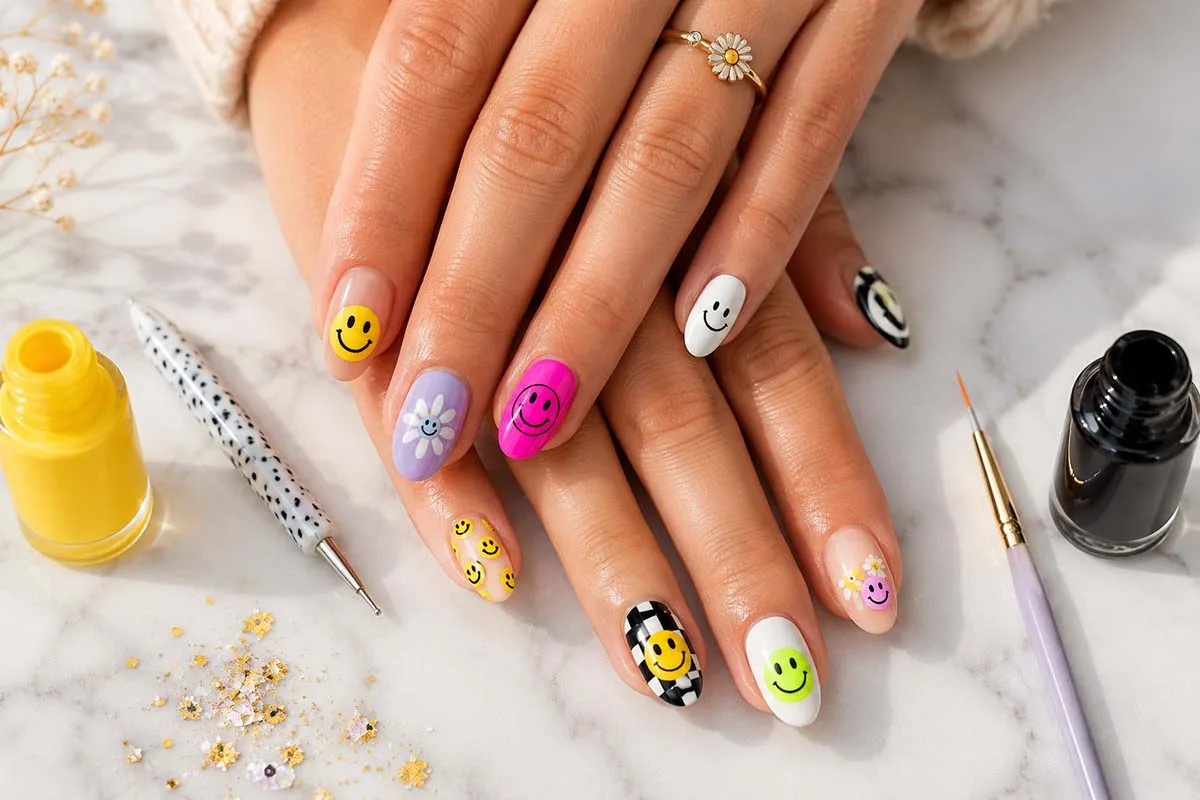
18 Easy Smiley Face Nails Designs to Try at Home
Classic and Simple Designs
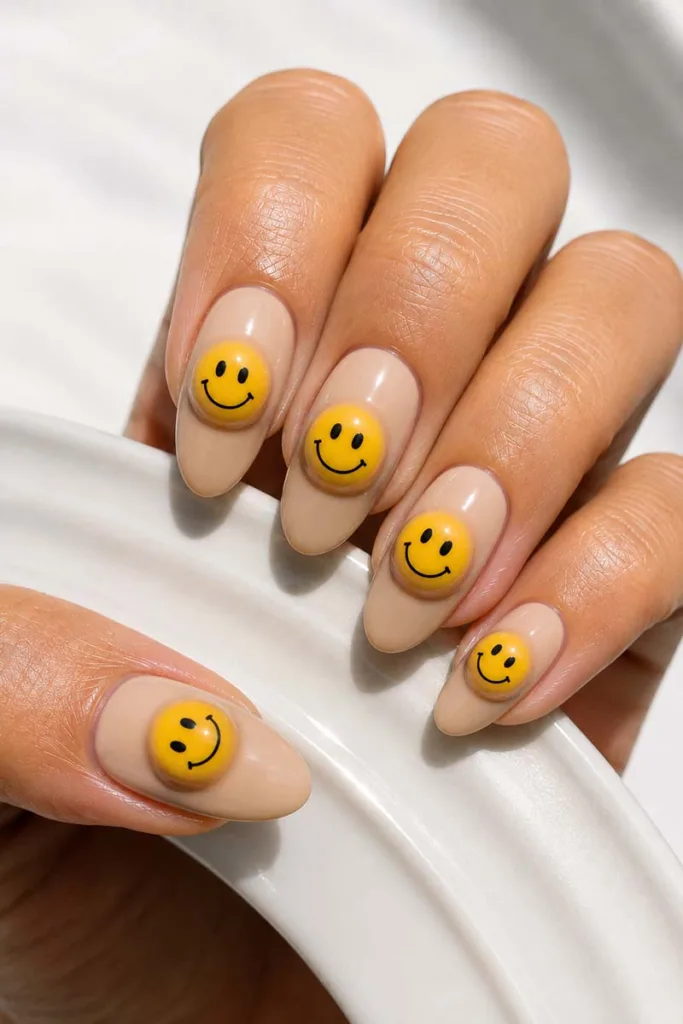
1. Classic Yellow Smiley Face on Nude Base
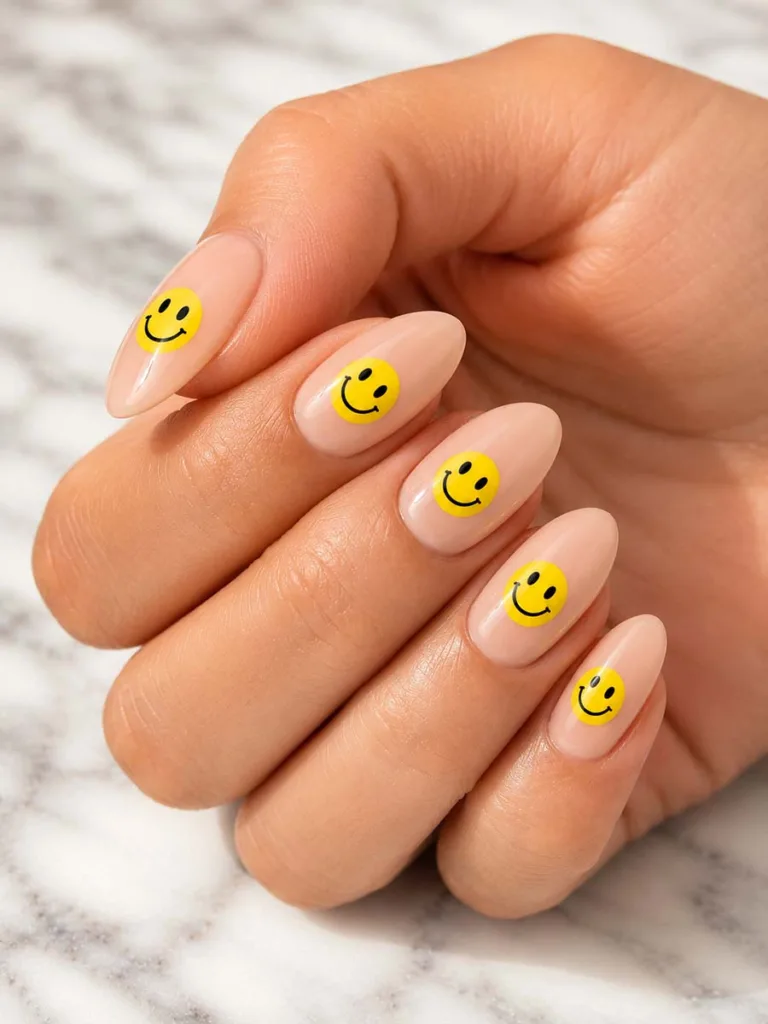
This is the starting point for any beginner. Apply a nude or blush base coat. Let it dry fully. Use a dotting tool dipped in yellow polish to create a round smiley face on your accent nail. Add two tiny black dots for eyes and a curved line for the smile using a nail art pen. Seal with top coat. Simple, clean, timeless.
Skill level: Beginner-friendly
2. Black and White Smiley Accent Nail
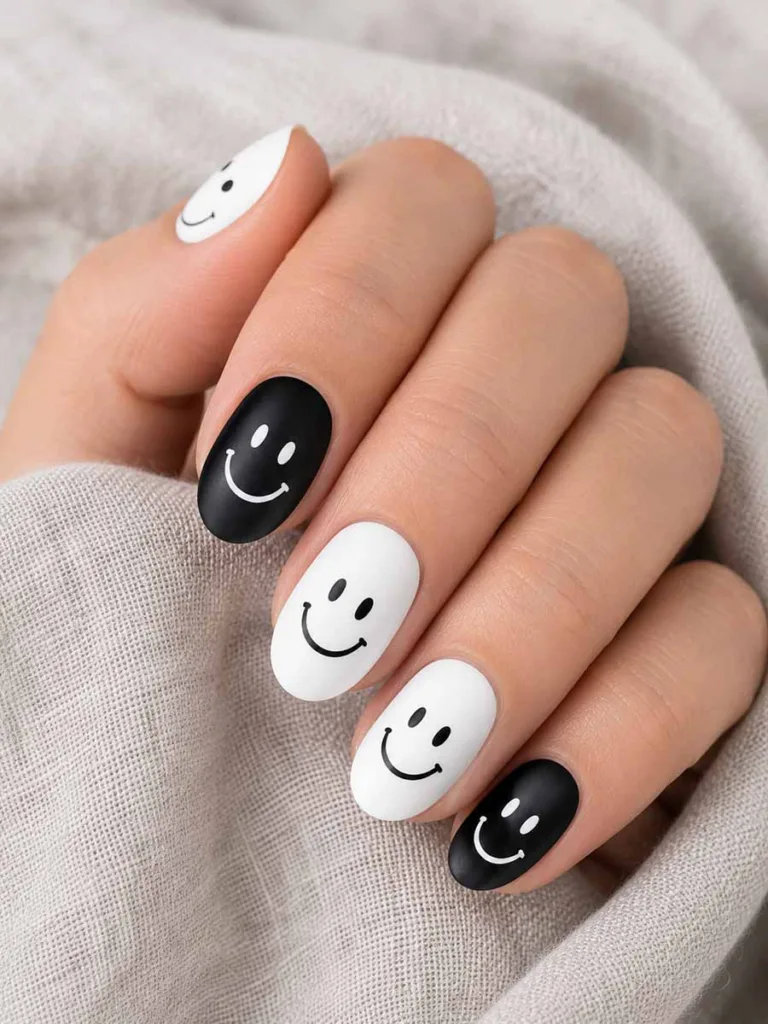
High contrast and effortlessly cool. Paint 4 nails in solid white. On the accent nail, apply black polish as the base. Draw a white smiley face using a thin liner brush. This monochrome nail design photographs sharply and pairs well with any outfit. Use a matte top coat for an editorial finish.
Skill level: Beginner-friendly
3. Mini Smiley Dots on French Tips

Give your French tips a playful upgrade. Apply a standard white tip. Once dry, use a toothpick to add tiny yellow smiley faces along the white section. Keep them small, spaced evenly. This works especially well on square and squoval nail shapes. It adds character without overpowering the classic look.
Skill level: Beginner-friendly
4. Smiley Face on Negative Space Nails
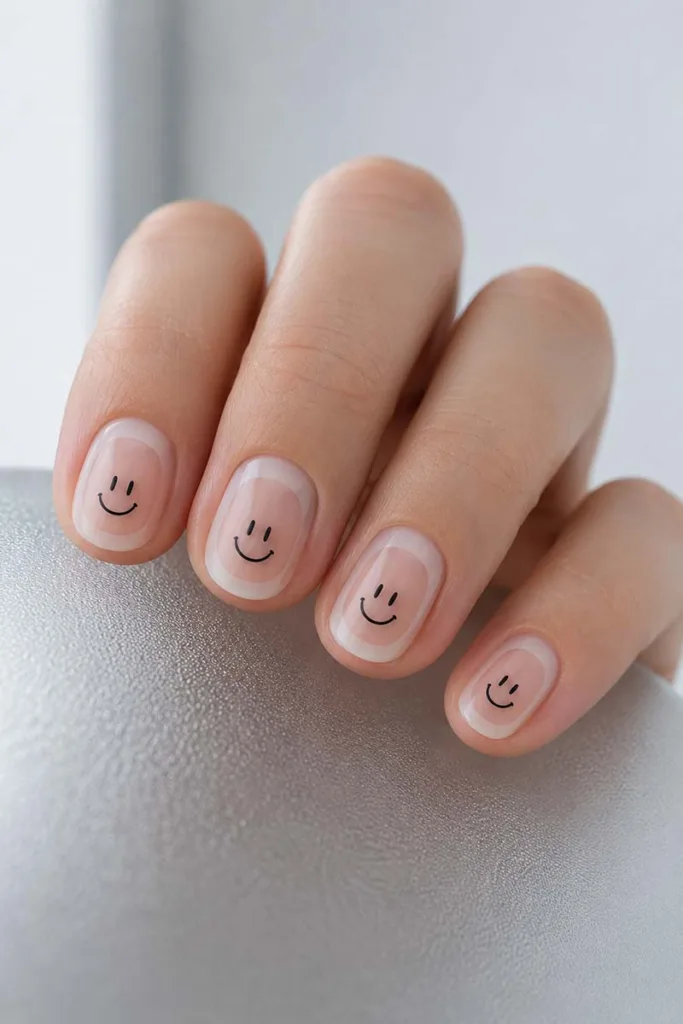
Leave part of the natural nail bare. Apply sheer polish to frame the negative space area. Draw a small smiley face directly on the bare nail using a black nail art pen. The contrast between bare nail and polish makes the design pop with minimal effort. Modern, clean, and graphic.
Skill level: Beginner-friendly
5. Single Smiley Thumb Nail Design
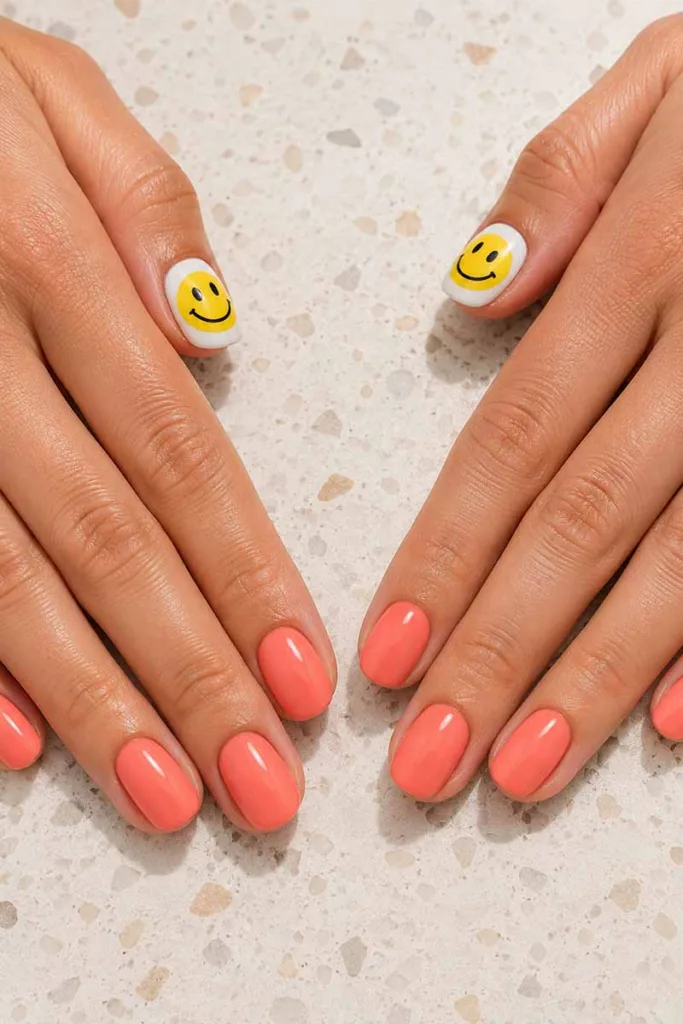
Not every nail needs a design. Paint all nails in one solid color. Reserve the thumb nail for a bold yellow smiley face on a white base. This single accent approach keeps things easy nail art at home while still making a statement. Great for first-timers who want to practice on one nail before committing to a full set.
Skill level: Beginner-friendly
Colorful and Bold Designs
6. Neon Smiley Face Nails on White Base
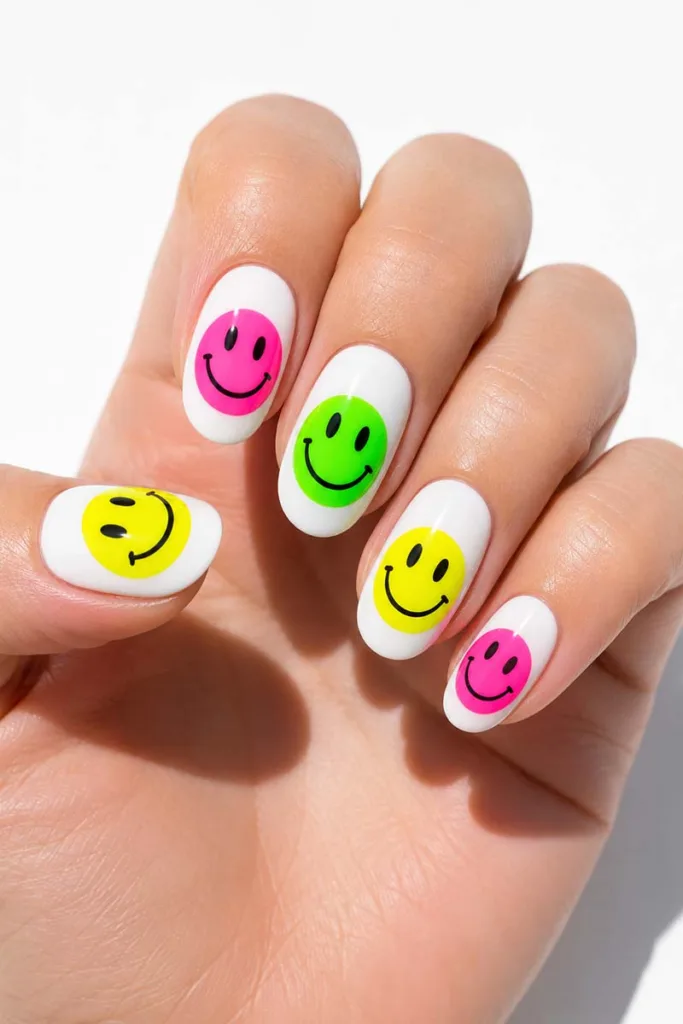
White base coats make neon colors scream. Apply 2 coats of white. Use neon yellow, neon pink, or neon green to draw oversized smiley faces on each nail. These summer nail designs work best under natural light. Add a glossy top coat to intensify the pigment.
Tip: Apply a white base under neon polish for true, vibrant color payoff.
7. Rainbow Smiley Ombre Nails
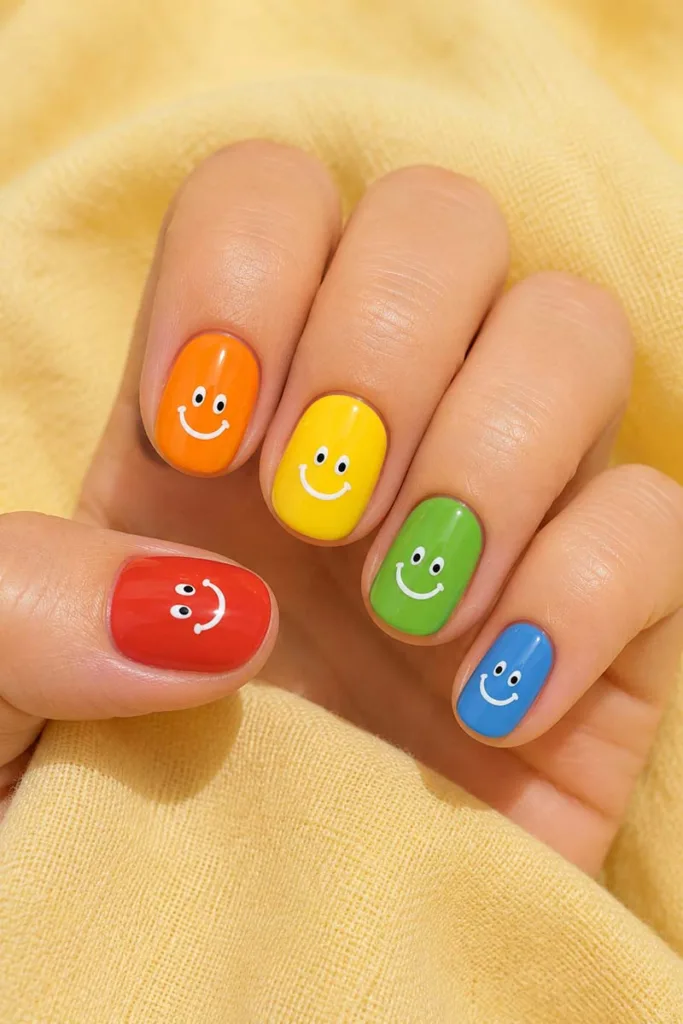
Apply a different pastel or bright shade to each nail. Red, orange, yellow, green, blue. Draw a small white or black smiley on each nail to unify the rainbow look. The result is colorful nail art that feels cohesive despite using 5 different shades. This design works well on short oval nails.
8. Pastel Smiley Face with Daisy Accents

Pair a pastel smiley face with tiny 5-petal daisies on the side of the nail. Use pastel yellow for the smiley, white petals, and a yellow center for the daisy. This combination creates soft, feminine pastel nail art that suits spring and summer. Keep the background neutral so the details show clearly.
9. Hot Pink Smiley with Heart Eyes
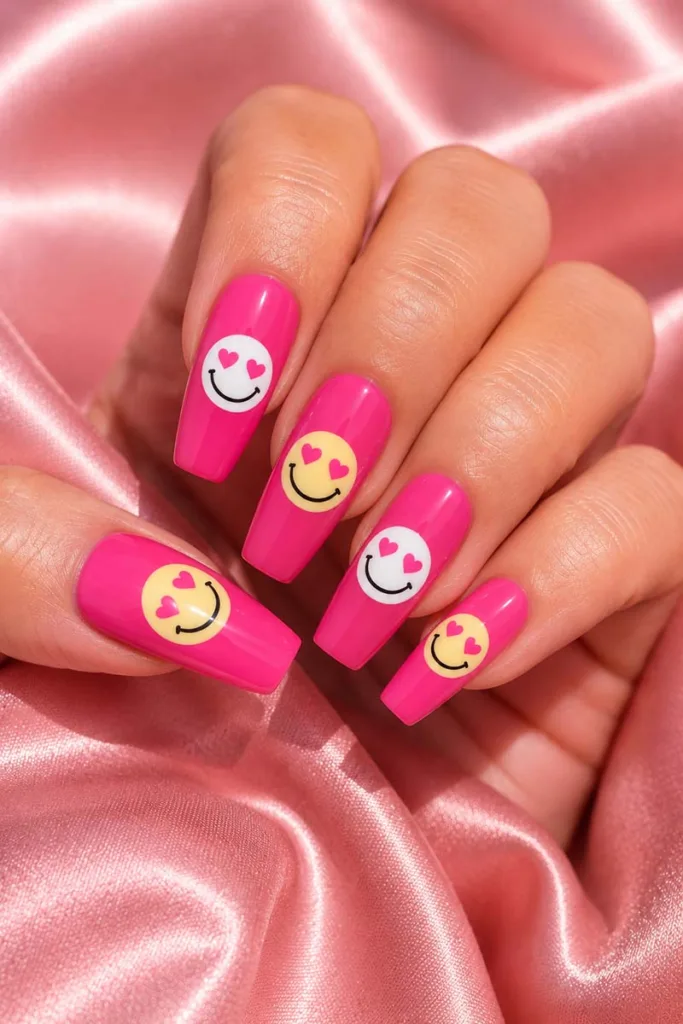
Replace the standard circle eyes with small pink hearts. Apply a bold hot pink background. Draw a white or yellow smiley face, then swap the eyes for heart shapes using a thin liner brush. This small swap transforms the design completely. It hits the intersection between cute nail designs and bold nail art ideas.
10. Color Block Smiley Nails
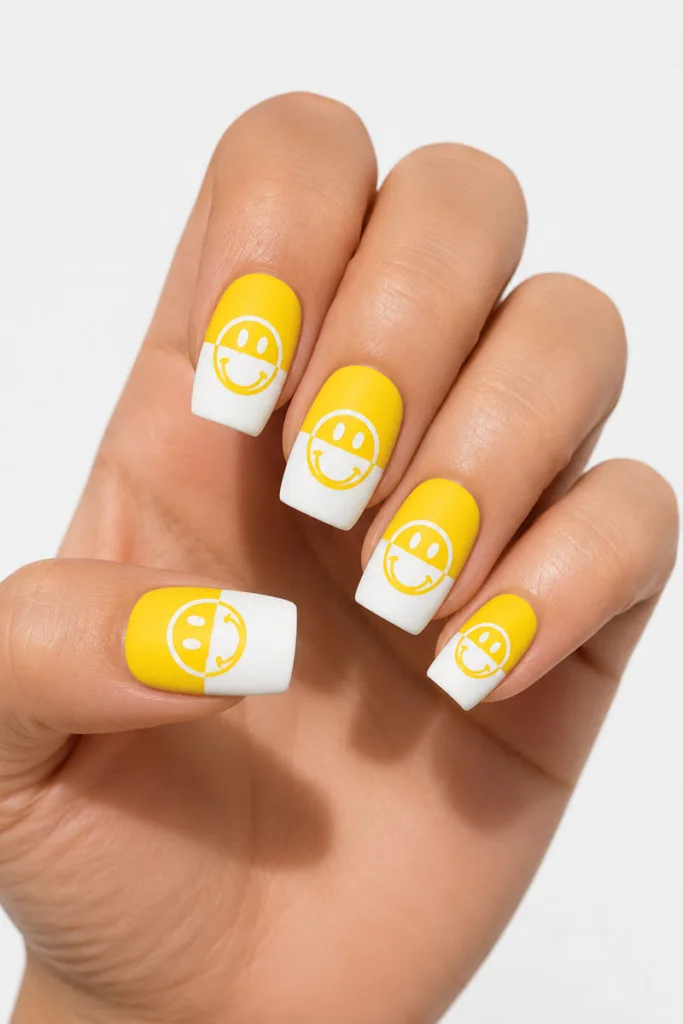
Divide the nail into 2 color blocks using nail tape. Yellow on top, white on the bottom. Draw a smiley face that spans both sections for a graphic, artistic effect. Remove the tape while polish is still slightly wet for the sharpest edge. This design is bold, modern, and takes less than 5 minutes per nail.
Aesthetic and Trendy Designs
11. Retro Smiley Face with Wavy Lines
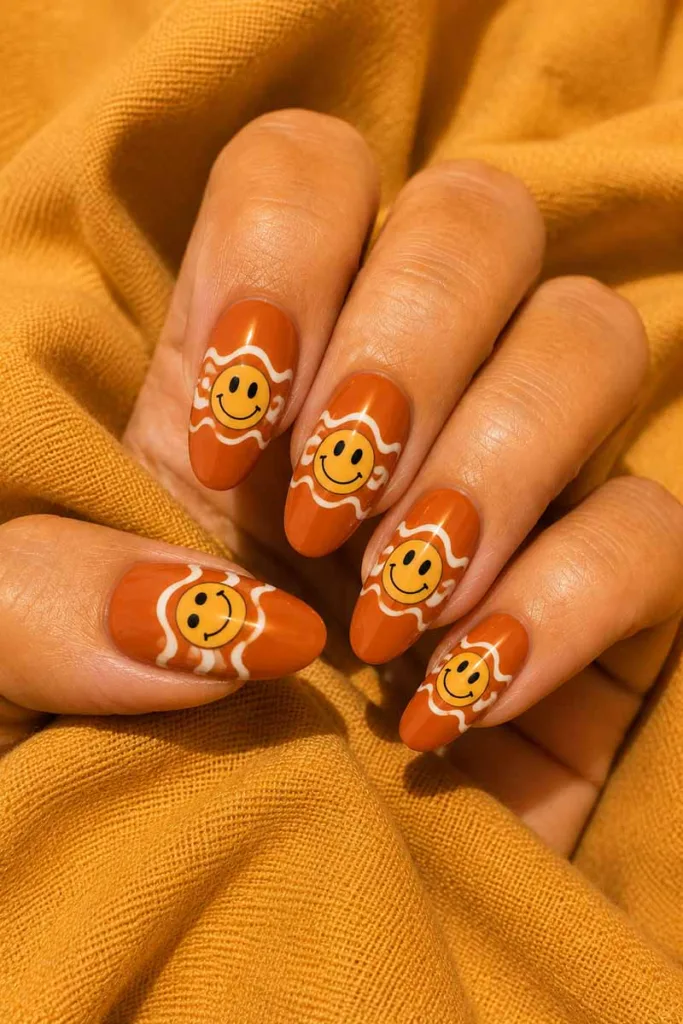
Add 2 or 3 wavy horizontal lines behind the smiley face for a groovy, retro nail art feel. Use contrasting colors. Orange smiley on a brown or mustard base with white wavy lines. This leans into the 70s revival happening alongside Y2K nail art and looks intentional rather than busy.
Nail shape recommendation: Almond or oval for the best visual balance.
12. Smiley Face Nails with Varsity Letter Detail
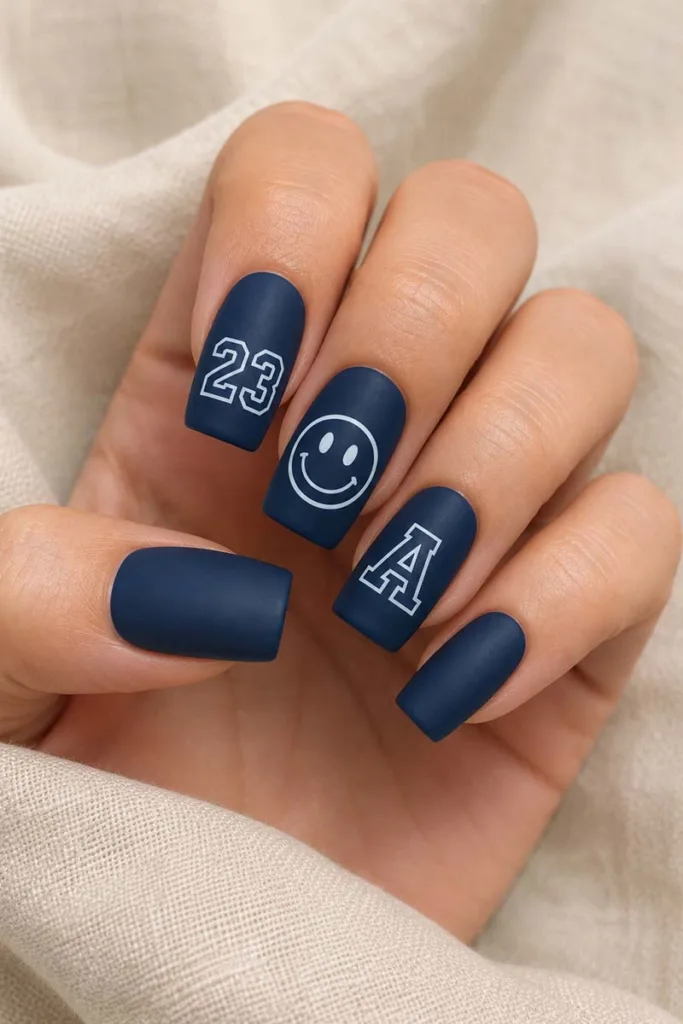
Apply a red or navy base coat. Add a white smiley face on the accent nail. On 1 or 2 neighboring nails, paint a varsity letter or number using a thin brush. Think: old-school athletic aesthetic. The varsity nail art trend pairs naturally with smiley faces and delivers a full collegiate-inspired set without needing professional equipment.
Nail shape recommendation: Square or squoval.
13. Groovy Smiley Swirl Nails
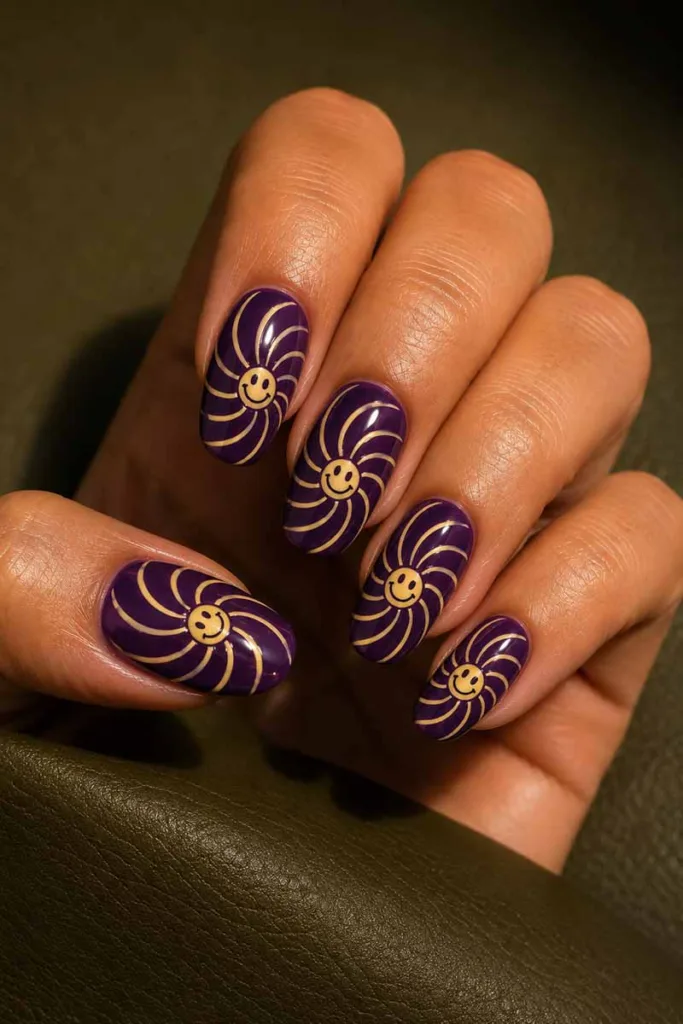
Paint a solid base in deep purple, olive, or burnt orange. Use a thin liner brush to draw swirling lines that spiral outward from the center of the nail. Place a small smiley face at the center of each swirl. This groovy nails design looks intricate but takes only basic brush control. Practice the swirl motion on paper first.
Nail shape recommendation: Oval or coffin.
14. Smiley Face Nail Art with Checkered Pattern
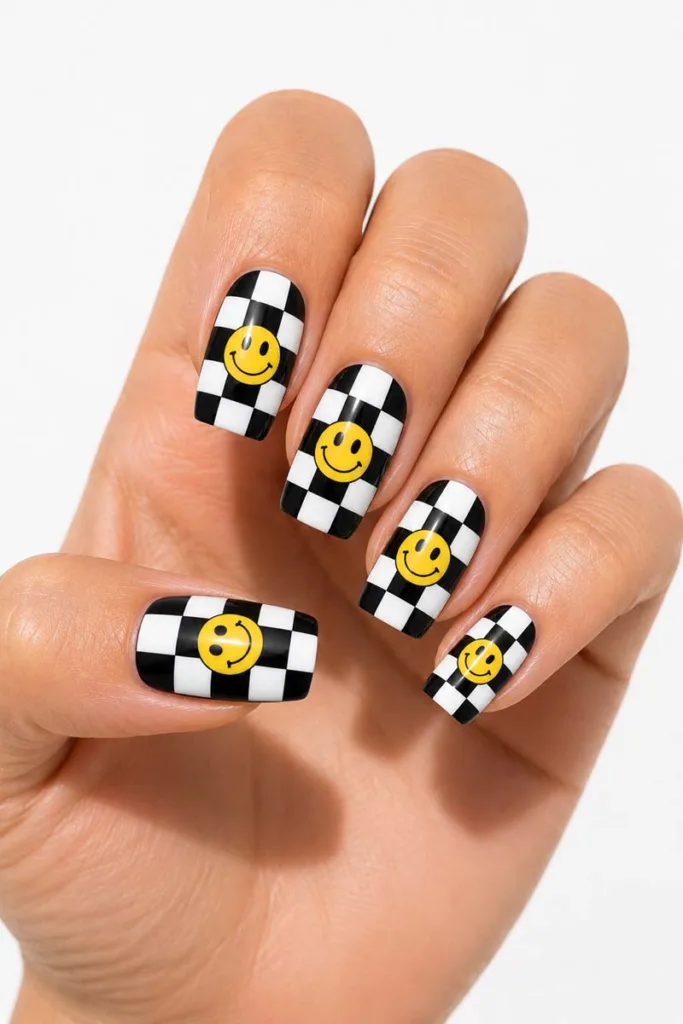
Divide the nail into a 2-color checkered nail design using nail tape. Black and white is classic. Once dry, draw a small yellow smiley over the checkered pattern. The contrast makes the smiley stand out sharply against the grid. This aesthetic nail art references both Y2K fashion and streetwear style simultaneously.
Nail shape recommendation: Square for the sharpest checker lines.
Advanced But Doable Designs
15. 3D Smiley Face Nails with Gel Builder
Use builder gel to create a slight dome shape on the accent nail. Cure under a UV lamp. Once solid, draw the smiley face on top using gel nail polish and cure again. The 3D nail effect adds texture and dimension you can actually feel. It takes 2 full attempts for most beginners to get the dome shape right. Stick with it. The result is worth it.
Tools needed: Builder gel, UV lamp, thin gel brush
16. Smiley Face Nails with Foil and Chrome Finish
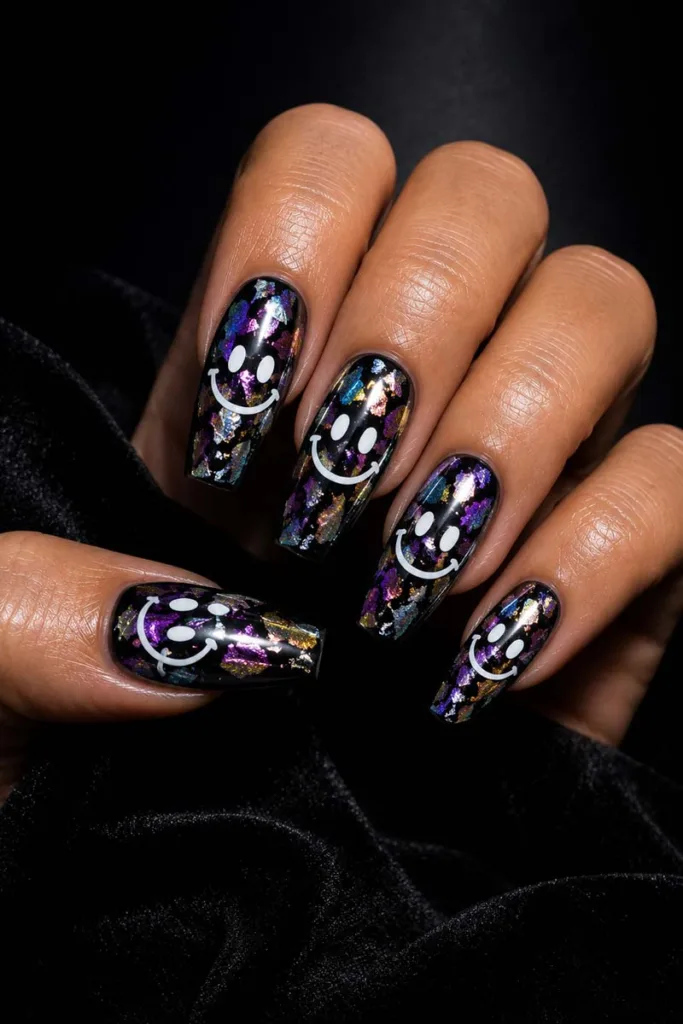
Apply a black or dark navy gel base. Cure fully. Press nail foil across the surface using a foil applicator or your fingertip. The foil creates a holographic or metallic base. Draw a smiley face over the foil using a white or yellow nail art pen. Seal with no-wipe top coat. Chrome nails and smiley face art together create a futuristic, high-fashion set.
Tools needed: Nail foil, foil adhesive or gel base, chrome nail powder (optional)
17. Glitter Smiley Nail Art on Dark Base
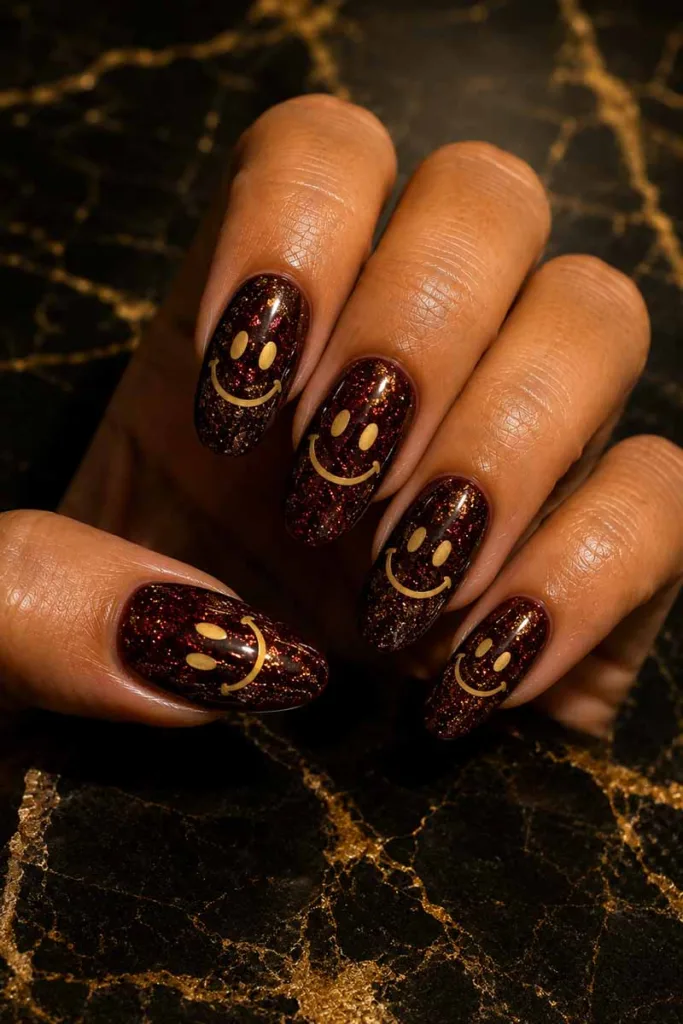
Apply a deep burgundy, forest green, or midnight blue base. While the second coat is still tacky, press fine glitter across the entire nail. Once dry, seal with top coat to lock the glitter in place. Draw a gold or white smiley face on top using a nail art pen. The glitter nail designs base makes the smiley face glow. Great for evening looks and special occasions.
Tools needed: Fine nail glitter, top coat, gold or white nail art pen
18. Mixed Expression Face Nails (Smiley + Sad + Surprised)
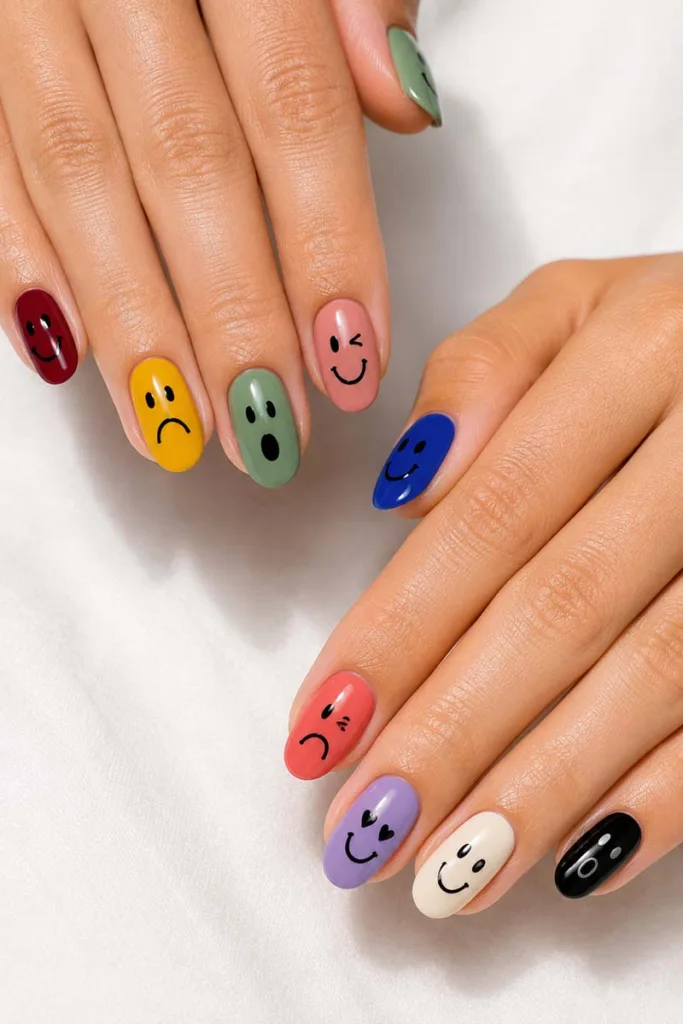
This is the most creative design in the set. Paint each nail a different solid color. On each nail, draw a different face expression: smiley, sad, surprised, winking, heart eyes. Use a thin liner brush for the mouth shapes and a dotting tool for eyes. The mixed expression nail art concept is trending hard right now. It tells a visual story across all 10 fingers. Takes patience, but no single face is technically difficult on its own.
Tools needed: Thin liner brush, dotting tool, nail art pen
7 Tips That Make Your Smiley Face Nails Last Longer
Prep is 80% of the result. The other 20% is how you finish.
- Buff and dehydrate first. Lightly buff the nail surface. Wipe with alcohol or nail dehydrator before applying any polish. This removes oil and helps polish bond properly.
- Apply thin coats. Thick coats peel faster. Two thin coats always outlast one thick coat.
- Seal the edges. Swipe top coat across the free edge of each nail. This step alone adds 3 to 5 extra days of wear.
- Cure gel fully. Under-cured gel lifts at the edges within days. Cure each layer for the full time your UV lamp requires.
- Avoid hot water for 24 hours. Hot showers and dishwashing right after application weaken fresh polish. Give it time to harden fully.
- Apply cuticle oil daily. Hydrated nails flex instead of crack. Use cuticle oil every morning to protect both the nail and the design.
- Use a peel-off base coat. This makes removal clean and damage-free. No acetone scrubbing needed. Just peel, reapply, and start fresh.
Long-lasting nail art starts before the first drop of polish touches the nail. Proper prep removes every barrier between your polish and a clean, lasting bond.
No Nail Art Pen? No Problem
Professional tools help. They are not required.
A bobby pin dipped in polish creates perfect dots for eyes and small round details. A toothpick works for thin lines, mouth curves, and precise placement. Both cost nothing and deliver clean results with a little practice.
Nail stamp plates with smiley face designs let you transfer a full image in one press. Apply polish to the plate, scrape off the excess, roll the stamper over the design, and press onto the nail. Clean and consistent every time.
Nail sticker decals are another strong option. Apply them as the base design and seal completely with top coat. They lie flat under gel top coat and look hand-drawn. These DIY nail tools and nail art hacks make beginner nail art tricks accessible for anyone, at any skill level.
Frequently Asked Questions
How do you make smiley face nails at home?
Apply your chosen base color and let it dry. Use a dotting tool or toothpick dipped in black or contrasting polish to create two small eyes and a curved smile. Seal with top coat once dry.
What nail shape works best for smiley face nail art?
Oval and almond shapes give the most surface area for detailed designs. Square nails work well for graphic, minimalist smiley styles. Both look sharp with this nail art for nail art longevity.
How long do smiley face nails last?
Gel versions typically last 2 to 3 weeks with proper prep and sealing. Regular polish lasts 5 to 7 days when you apply a quality top coat and seal the edges correctly.
Conclusion
These 18 designs prove that smiley face nails are one of the most approachable nail art styles out there. Grab a dotting tool, pick a design that excites you, and try it this weekend. Your nails will thank you.
For more exciting nail designs, please visit VelvetBoard.