21 Dutch Braid Hairstyles For Different Hair Lengths

Do your Dutch braid hairstyles slip loose or feel too tight before your day has even started? Choosing a suitable braid path and finish can make styling more manageable without pulling harder at the roots. Start with the length you can comfortably gather, then decide how much hair you want left loose.
A chin-length bob may suit a side accent, while a tucked crown usually needs more length. Layers, density, and texture also change how the finished style looks. The same photograph can inspire your choice without becoming an exact promise for your own hair.
Below are twenty-one options with practical length notes, styling differences, and clear descriptions you can use with a stylist. You will also find a five-step tutorial, troubleshooting for slipping, and guidance on comfortable wear. Choose a manageable look instead of tightening every section until nothing moves.
Choose Dutch Braid Hairstyles By Length And Finish
Match the braid’s route to the hair you can gather without stretching short pieces into place. These starting points help narrow the list before you choose a photograph.
| Your Starting Point | Styles To Consider | What To Check |
|---|---|---|
| Short bob or shorter layers | Side accent, headband, or a small half-up braid | Whether the shortest sections reach the next pickup |
| Shoulder-length hair | Single braid, doubles, loose-ended pigtails, or a low bun | Whether the tail reaches the intended finish comfortably |
| Longer hair | Crown, milkmaid, fishtail hybrid, or a diagonal braid | Enough length for wrapping, tucking, or a longer tail |
| Fine or lower-density hair | Small accents, a half-up braid, or gently widened sections | A comfortable result without tightening to create grip |
| Curly or coily lengths | Braided front sections with loose curls, doubles, or selected feed-in styles | Detangling method, shrinkage, and any added extension weight |
Understand The Under-Cross Technique
A Dutch braid crosses the outer strands under the center while new hair joins the braid along its path. A French braid crosses them over the center instead. Dutch braids generally create a more raised ridge, while French braids sit more closely within the gathered sections. The distinction is construction, rather than a guaranteed amount of volume.
For two braids, a defined part can make the arrangement look intentional. Hairstylist Angela Boswell told IPSY’s Dutch and French braid guide, “A clean part will make it look more purposeful.” A softer part is also an option when that suits the finish you want.
Use Comfort To Set The Tension
Keep the sections controlled without pulling sharply at your hairline. The AAD’s guidance on hairstyles that pull explains that repeated tension can cause hair loss. Loosen or remove a style that causes pain, stinging, or scalp irritation. Persistent symptoms or thinning deserve assessment rather than tighter restyling.
How To Dutch Braid In Five Steps
Practice a single braid before adding a complicated part or pinned finish. Use the same under-cross pattern while keeping the sections easy to hold.
- Detangle gently in sections using a method suited to your texture. Prepare the intended part and separate any hair that will stay loose.
- Take a manageable starting section and divide it into three strands. Cross the right outer strand under the center, then the left under the new center.
- Add a small section of loose hair to the next outer strand. Cross that combined strand under the center and repeat on the opposite side.
- Continue collecting hair along your chosen path without pulling harder at the roots. Once pickups stop, continue the same three-strand pattern through the tail.
- Secure with a suitable hair tie and check the scalp for uncomfortable pulling. For a wider finish, ease the outer loops outward gradually without tugging at the roots.
After each crossing, the strand moved underneath becomes the new center. Pause and reset your grip when needed instead of tightening to regain control. Beginners may find a shorter practice section easier than attempting both sides of a full style immediately.
21 Dutch Braid Hairstyles To Compare
Each entry explains the braid path, finish, and useful length considerations. Use its stylist description as a starting point, with tension and extensions discussed separately.
1. Classic Single Dutch Braid
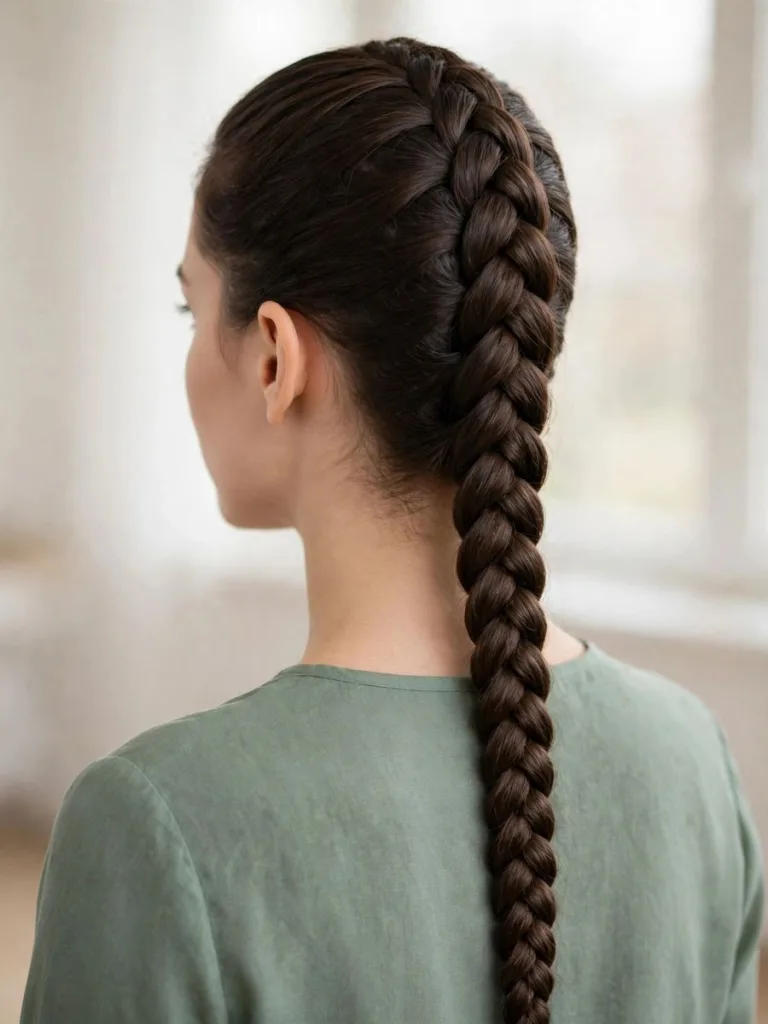
One raised braid travels down the center of the head before continuing into a loose-hanging braided tail. Start with a manageable section near the front or crown and gather hair along the center line. This is a useful practice shape because it avoids a separate part for each side.
Shoulder-length or longer hair often gives more room for a visible tail. Shorter layers may need discreet pins or a shorter finish rather than extra tension. Keep the pickup direction consistent so the braid does not drift sideways.
Best for: Learning the under-cross pattern and keeping most hair gathered.
Ask your stylist for: One centered Dutch braid with comfortable pickups and a braided tail.
2. Double Dutch Braids

A center part divides the hair into two sections, with one Dutch braid following each side toward the nape. Braiding the sides separately lets you compare their starting points and width. The tails can continue as braids or stop earlier for loose ends.
This option can suit medium or longer lengths when both sides reach their pickup paths. Aim for a balanced appearance without matching every strand exactly. Secure the ends for activity while keeping the hairline comfortable.
Best for: Paired braids with a defined part and gathered lengths.
Ask your stylist for: Two Dutch braids on a center part, with the tail length adjusted to my layers.
3. Dutch Braid Crown

A continuous scalp braid follows a circular route around the head. Hair is gathered along that route, and the remaining tail is tucked and pinned near the starting point. The defining feature is the continuous pickup path rather than two finished plaits placed over the top.
Longer lengths usually make the tucked finish easier, although layers and head size affect the reach. Ask where the join and pins will sit before choosing this style. Our braided crown hairstyles guide offers more shapes to compare.
Best for: A fully gathered crown with a tucked finish.
Ask your stylist for: A continuous Dutch crown braid with a comfortable hairline and a concealed join.
4. Half-Up Dutch Braid

A braid gathers a selected top section while leaving the lower lengths loose. It can end near the crown with a small tie or discreet pins. Keeping the gathered area narrow helps distinguish it from a full single braid.
This is an adaptable option when a full braid cannot collect shorter lower sections. The loose hair can keep its natural straight, wavy, or curly texture. Decide how far back the braid should travel before separating the top section.
Best for: Face clearance while keeping loose length visible.
Ask your stylist for: A single half-up Dutch braid with the lower hair left loose.
5. Side Dutch Braid Into A High Ponytail

A Dutch braid follows one side of the head before joining the hair gathered into a high ponytail. The side placement matches the accompanying image and keeps the braid visible near the temple. The ponytail remains unbraided below its tie.
Check that the shorter side sections reach the ponytail position without pulling. A lower ponytail may be more comfortable if the high placement stretches those sections. Our braided ponytail hairstyles guide shows other placement options.
Best for: A high ponytail with a visible side-braid detail.
Ask your stylist for: A side Dutch braid feeding into a ponytail at a comfortable height.
6. Side Dutch Braid
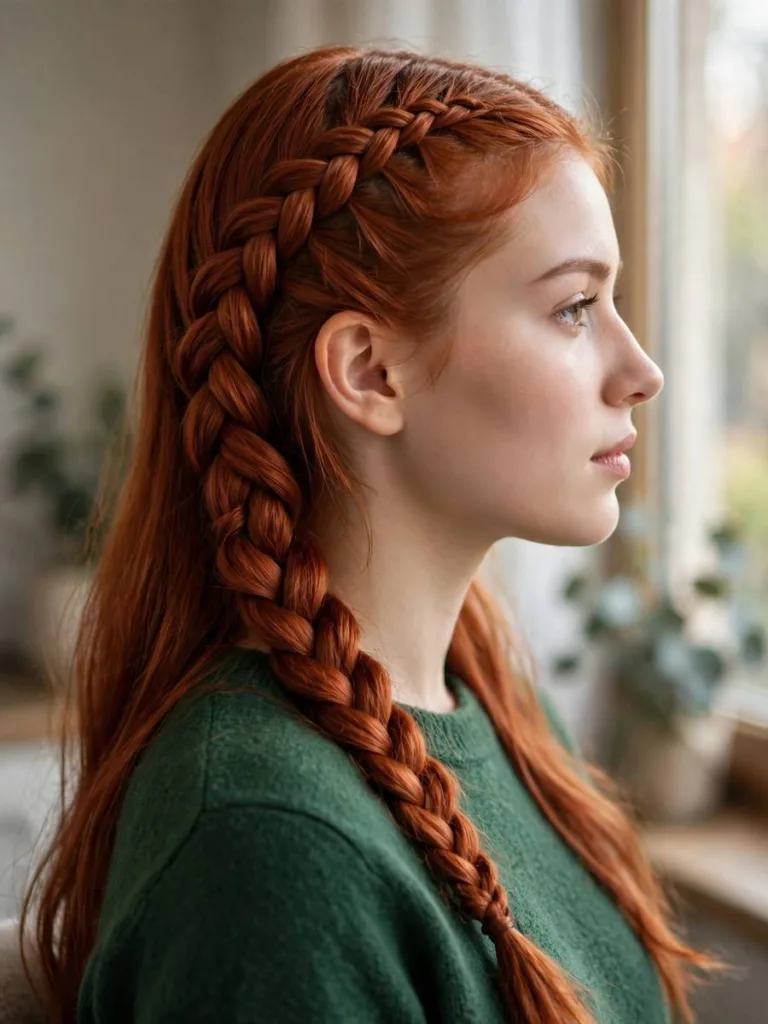
A braid travels from one temple along the side of the head and finishes over a shoulder. Unlike the ponytail version, its braided tail remains the main finish. A side part can place more hair along the chosen route.
The opposite lengths may stay loose or feed into the braid, depending on the design. Be clear about that choice when using a reference photograph. Longer hair makes a shoulder-length tail easier, while shorter hair can use a pinned side accent.
Best for: An asymmetric braid with a visible shoulder finish.
Ask your stylist for: A side Dutch braid over one shoulder, adapted to my length.
7. Dutch Braid Into A Fishtail
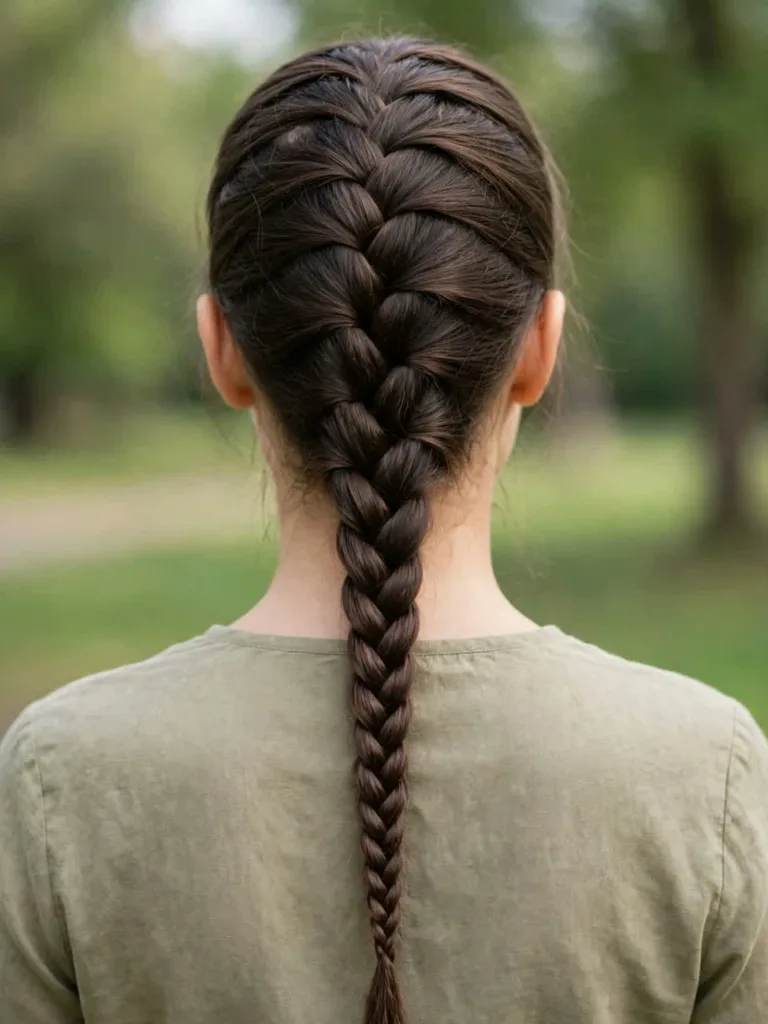
This hybrid starts as a three-strand Dutch braid and changes to a two-section fishtail after the scalp pickups end. At the transition, divide the remaining hair into two sections. Transfer small outer pieces across to the opposite section to build the fishtail pattern.
Enough loose length below the nape makes the change in texture easier to see. Keep the transition secure without pulling at the scalp to support the tail. A clear reference should show one Dutch braid changing into a recognizable fishtail.
Best for: Longer hair and a visible change from a raised braid to a finer tail.
Ask your stylist for: A single Dutch braid that changes to a two-section fishtail below the nape.
8. Low Dutch Braid Bun

A centered Dutch braid reaches the nape, where the remaining braided tail coils into a low bun. Pins hold the coil without drawing the whole style tighter. The scalp section should retain the raised Dutch ridge above the bun.
The tail needs enough length to coil and tuck without being forced into place. With shorter hair, a smaller tucked finish may be more practical. Check how the bun feels against your collar before adding more pins.
Best for: A gathered style with tucked ends at the nape.
Ask your stylist for: A raised Dutch braid ending in a low, comfortably pinned braided bun.
9. Double Dutch Braids Into Space Buns

Two front-to-back braids travel toward paired high buns. Each braid finishes where its bun will sit, and the remaining tail wraps around that base. Planning the bun positions first helps prevent the two sides ending at noticeably different heights.
Medium or longer hair gives more length to wrap, while short ends may need small pins. Keep both buns secure without tightening the braids to lift them. This version differs from upside-down braids that start at the nape.
Best for: Paired high buns with braided front sections.
Ask your stylist for: Two front-starting Dutch braids ending in space buns at matching heights.
10. Dutch Pigtails With Loose Ends

Two scalp braids stop near the nape, leaving the lengths below their ties unbraided. The open tails create a different finish from full-length double braids. They can show natural waves or curls without extending the braid pattern.
This can be useful when the loose lengths look fuller than a tightly braided tail. Choose ties that hold without snagging, and detangle the open ends gently. Their length depends on where the braids stop and how much hair remains.
Best for: Braided top sections with soft, loose pigtails.
Ask your stylist for: Double Dutch braids that stop at the nape, with the remaining lengths left loose.
11. Four Dutch Braids
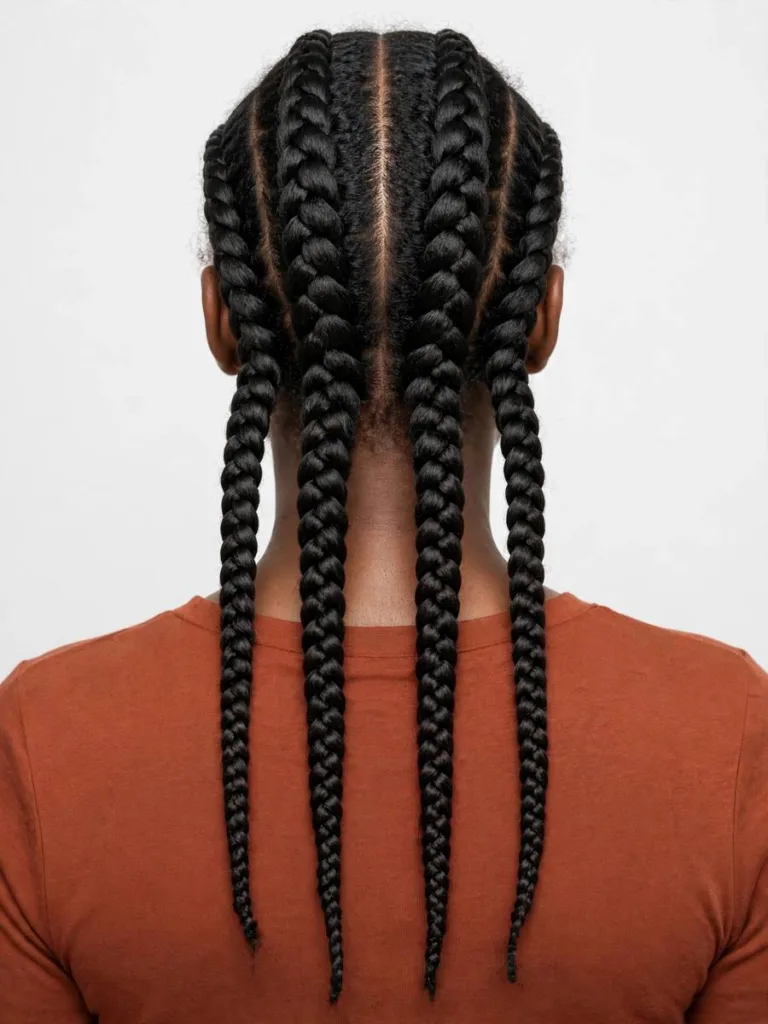
Three part lines divide the head into four lanes, each with its own underhand scalp braid. The rows can be narrow or moderately wide according to density and the intended design. They do not need to be pulled tightly to look defined.
This style requires more sectioning than doubles, especially around shorter layers. Allow time to create workable lanes rather than making every part perfectly straight. Discuss whether extensions are needed for the pictured tail length.
Best for: Four defined rows and a more detailed parting pattern.
Ask your stylist for: Four comfortably braided Dutch rows with lane widths suited to my hair density.
12. Dutch Braid Headband

A scalp braid follows the front hairline while the hair behind it stays loose. Hair is collected along the front route to create the raised band. A normal finished plait laid over the head creates a different construction.
The front sections need enough length to join the next pickup without tugging at fine hairline hairs. Pin the tail discreetly where the route ends. A close side view is useful for showing the pickups and where the braid attaches.
Best for: Holding front sections back while keeping the rest loose.
Ask your stylist for: A Dutch scalp braid across the front hairline, with its tail tucked discreetly.
13. Lace Dutch Braid

A lace Dutch braid adds new hair from one side only while maintaining the under-cross pattern. The other edge stays free instead of collecting hair from both sides. This creates a lighter front or side accent with a clearly directed pickup line.
Choose the pickup side according to the route and the hair you want to gather. Avoid adding extra decorative braids if the goal is to show this technique clearly. Shorter layers may need a shorter route or small supporting pins.
Best for: A one-sided pickup technique and a softer front accent.
Ask your stylist for: One lace Dutch braid with pickups from one side and the other edge left free.
14. Feed-In Dutch-Style Braids

Feed-in describes adding extension hair in small stages rather than attaching all the extra hair at the start. In this paired style, the underhand rows begin smaller and become fuller along their paths. The extension technique and braid pattern are separate choices.
Ask a trained stylist about the amount, weight, and length of added hair before installation. A long tail should not require painful tension at the roots. The reference shows the finished shape, but cannot prove how extension hair was added.
Best for: Added length or fullness with a gradually built braid.
Ask your stylist for: Two underhand feed-in rows with extension weight and hairline tension kept comfortable.
15. Dutch Braids With Loose Curls

Two short Dutch braids gather selected front sections and stop near the crown. Most of the curly lengths remain loose beneath the ties. Keeping the braided area distinct helps the curls remain the main feature of the finished style.
Detangle only as needed using a method suited to your curls. You do not need to brush the loose lengths smooth to complete the braids. Choose a narrow enough starting section that the front can be gathered comfortably.
Best for: Braided front detail with loose curls below.
Ask your stylist for: Two short front Dutch braids ending near the crown, with my curls left loose.
16. Short Hair Side Dutch Braid

A small braid starts near the temple and follows a short route above the ear. The rest of the bob or lob stays loose. A short route can collect sections that would not reach a full braid down the back.
Chin-length hair may suit this accent, but the shortest layers determine what can be picked up. Stop the braid where those sections no longer reach comfortably. A discreet pin can support the finish without pulling the hairline tighter.
Best for: A small braided accent in a bob or layered shorter cut.
Ask your stylist for: A short side Dutch braid above the ear, adapted to my shortest layers.
17. Center Dutch Mohawk Braid

A raised braid follows a selected center strip, with the side sections arranged smoothly beside it. The contrast creates height through the middle without requiring shaved sides. The braid can start smaller near the hairline and become fuller toward the crown.
For extra width, ease the outer loops gradually after securing the tail. Keep the roots comfortable rather than tightening the sides to exaggerate the contrast. The finishing height depends on your hair, section size, and any added material.
Best for: A raised center shape with smoother side sections.
Ask your stylist for: A center Dutch braid with controlled volume and comfortable, smooth sides.
18. Milkmaid Dutch Braids

Two braids are made on separate sides and their finished tails are brought across the top of the head. Pins secure the ends beneath the opposite braid. Unlike a continuous crown braid, this style uses two completed tails to form the band.
Ask for Dutch scalp sections first if that technique is important to the look. Ordinary three-strand pigtails crossed over the crown are a related milkmaid style. Each tail needs enough length to reach its pinning point without pulling at the base.
Best for: Two crossed braid bands with a pinned finish.
Ask your stylist for: Two Dutch-based braids with the tails crossed over the crown and the ends concealed.
19. Diagonal Dutch Braid
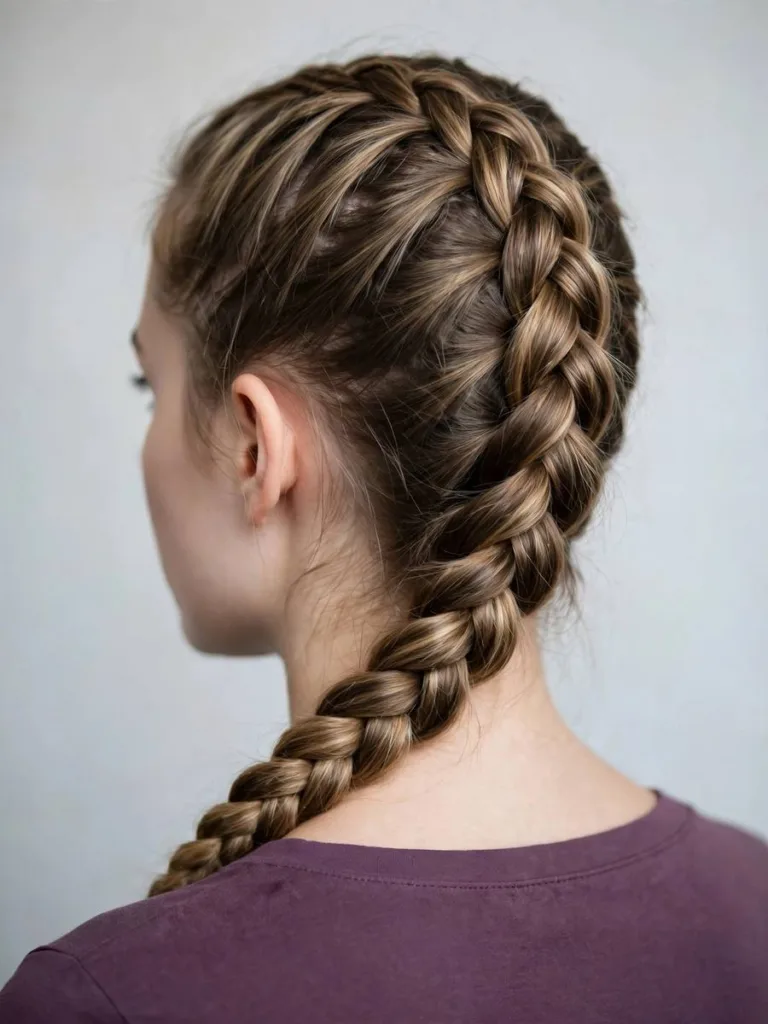
One scalp braid travels from a higher starting point on one side toward the opposite nape. The angled pickup path distinguishes it from a centered braid. The tail can hang over a shoulder or be tucked into a small finish.
Plan the route before starting, especially if layers are shorter on one side. A second mirror can help you check the direction without pulling sections sideways. Keep pickups manageable rather than changing tension to hold the angle.
Best for: An angled braid path and an asymmetric tail.
Ask your stylist for: One Dutch braid following a diagonal route toward the opposite nape.
20. Wide Pancaked Boho Dutch Braid

A Dutch braid is widened by easing its outer loops outward after the tail is secured. Work a little at a time, alternating sides so one loop does not take all the slack. Looser face-framing pieces can complete the relaxed finish.
Longer hair can provide more room for widening, while layered ends may escape if pulled too far. Fine hair can also be eased gently without demanding the width shown in a reference. Stop when the braid remains comfortable and its structure still holds.
Best for: A wider, softer braid with deliberately loosened loops.
Ask your stylist for: A gently pancaked Dutch braid, with the width adjusted to my density and layers.
21. Jumbo Dutch Braids

Two larger braids create a chunky paired shape on a center part. The finished size depends on natural density, sectioning, and whether extension hair is added. Large-looking braids do not necessarily come from using fewer pickups alone.
Discuss weight and length before copying a very full reference. Keep the starting sections comfortable and avoid gathering delicate hairline hairs under extra tension. You can choose a shorter or lighter version while retaining the paired shape.
Best for: A fuller paired-braid shape with carefully considered weight.
Ask your stylist for: Two jumbo Dutch-style braids with fullness, length, and extension weight discussed beforehand.
Care And Troubleshooting For Dutch Braid Hairstyles
Hold depends on your texture, layers, products, activity, and how the braid is constructed. Comfort should determine whether you keep wearing a style, rather than a promised number of days.
If Sections Keep Slipping Out
Try smaller, manageable pickups and reset your hand position before tightening. A small amount of a styling product you tolerate may help some hair textures, but it is optional. Use a discreet pin for an escaping layer when appropriate. If sections cannot reach the braid, shorten the route or choose a different finish.
If The Braids Feel Too Tight
Loosen or remove the style when it causes pain, stinging, or irritation. Do not wait overnight for discomfort to become normal. Repeatedly using the same tight path can stress the same areas. Seek advice for persistent scalp symptoms, broken hair around the hairline, or thinning.
For Overnight Wear And Gentle Removal
Only keep a braid overnight if it remains comfortable and fits your usual hair-care needs. A loosely fitted satin or silk covering can be gentler than a tight wrap. Undo ties carefully and work upward from the tail in stages. Detangle freed sections using a method that suits your texture and the products you used.
FAQs
The best choice among these Dutch braid hairstyles depends on reach, comfort, and the finish you want. Use these answers to adapt the technique rather than copy a photograph at any cost.
What Is The Difference Between Dutch And French Braids?
Dutch braids cross outer strands under the center while collecting new hair. French braids cross them over the center. The Dutch pattern generally gives a more raised appearance.
How Long Does A Dutch Braid Take?
Time varies with practice, sectioning, length, and the chosen finish. Four rows or a pinned crown usually involve more preparation than a simple single braid. Allow time to loosen uncomfortable sections rather than rushing them.
Do Dutch Braids Work On Short Hair?
A short side or front accent may work when the relevant sections can reach the next pickup. The shortest layers matter more than an overall chin-length label. Very short sections may need another styling approach.
How Can I Stop A Dutch Braid From Slipping?
Use manageable sections and keep the pickup pattern consistent. Try a tolerated grip product or discreet pins if they suit your hair. Avoid using extra root tension to compensate for pieces that are too short.
Can I Sleep In Dutch Braids?
Comfortable, loosely secured braids may suit overnight wear. Remove or loosen anything that hurts, stings, or irritates the scalp. A satin covering does not make a tight style safe to keep.
Which Dutch Braid Hairstyles Suit Fine Hair?
Small accents, half-up options, or a lightly widened braid can be useful starting points. Choose according to density and layers rather than assuming fine hair needs tight braids. Adjust the expected width of the finished style.
Final Thoughts
Choosing Dutch braid hairstyles is easier when you consider your shortest layers and a comfortably supported finish. A small side accent can be just as useful as a full crown or paired braids. Reference photographs help explain the direction, but your own texture and comfort guide the final version. For your next attempt, choose one style from this list and note the braid path you want to try.